TFS -> TeamCity -> Nuget -> Octopus -> Somewhere

If your not running Octopus, go out and get it today. An Octopus Deploy server has become as essential as a Build server in modern development departments these days. This post is about how I’ve been implementing them, which I’ve done in a few setups so far.

The “Source to Build” Setup is simple, I’m not going to go too much into that, if you cant get TeamCity talking to your source control you are probably in the wrong field.

TeamCity is the meat in this sandwich so this post focuses mainly on that.

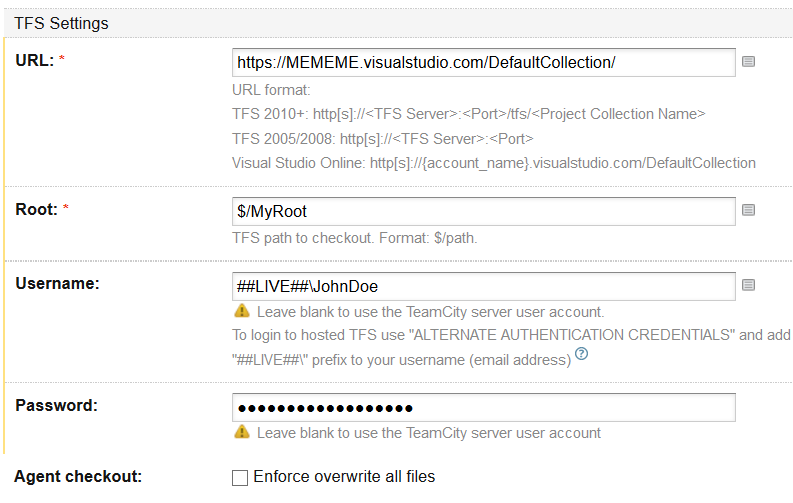
The only out-of-the-ordinary thing that I ever did was TeamCity->VSO which requires you to generate the basic auth creds (https://www.visualstudio.com/en-us/integrate/get-started/auth/overview) for an account then put them into the TeamCity VCS root. the odd thing about this is that when connecting to TFS (On premise) the username format is DOMAIN\Username, but with VSO its ##LIVE##\Username

e.g. ##LIVE##\JohnDoe

TFSSource

Also on that note, i recommend using the “Assemblyinfo patcher” to get your version numebrs up to date.

And, the VCS Labeling, throw a label into TFVC for every build, the convention i normally use is “BuildName_VersionNumber”

I also create a fake build in TFS for some of my projects with the associated link, so we can still make use of the work item and test case links back to builds (RE: https://github.com/JakeGinnivan/TfsBuildResultPublisher)

Octopus Feeds off a nuget repo, so the next step is to get your packages into a nuget feed. Octopus has a nuget feed built in but you can run your own as well. You cant use the octopus nuget feed for anything else though, so if you are pushing shared private libraries and need a target (like i do) then you’ll need to get another nuget solution.

The first step though is to get you Visual Studio Projects outputting the nuget packages, to do this add octopack to them

https://www.nuget.org/packages/OctoPack/

Once this is done you’ll get the build output you need and can add a “NuGet Publish” step into team city to push up the output

They will output to a sub folder so I usual use the following Packages location in the step to avoid it getting unwanted packages.

**\octopacked\*.nupkg

Then you can drop in your API key from your octopus user (http://docs.octopusdeploy.com/display/OD/How+to+create+an+API+key) and then the package source set to https://MYOCTOPUSSERVER/nuget/packages

buildnuget

Then for the next step in TeamCity you’ll need the plugin installed (http://docs.octopusdeploy.com/display/OD/TeamCity) this will give you the option for a “OctopusDeploy: Create Release” step that you can run once the nuget packages are published.

From this step you can configure things like an initial environment to auto Deploy to, etc. its very well done.

Buildocto

If you read my previous post about adding release notes you will understand the last variable in that screen shot. I put html content with hyperlinks back into TFS Web Interface (work items and Change sets) into the octopus releases notes for easy track back.

Once you’ve got all this up you’ll need to configure octopus.

I normally match my solutions in VS to projects in octopus one for one, then create step in octopus for each deploy-able project (e.g. each web site, web service, windows service, etc.),

Each visual studio output projects is configured as a “Deploy a nuget Package” Stepnugettype

After creating it go down to the features to see the available options

Features

The IIS Support is good but not perfect (doesn’t support sub folder at this time), some of my web services deploy to version numbered sub-folders (e.g. https://mysite.com/v1.5/ ), so we had to roll our own deployment scripts for this

The XML transform and substitution is great.

I’m not a fan of the red gate database stuff, but each to his own.

Windows service, is a windows service.

Once this is configured you can drop a few tentacles on servers broken up into environments (dev/live/etc) and away you go.

livestage

I’ll get into the detail of the tentacles and how I deploy them in other posts, there a lot of options here, including good integration with Azure VMs. But skies the limit from here really, the octopus/tentacle combo gives you some great flexibility and only has a few holes which i’ve got some advice on for future posts

Caching Principles

I recently had to explain some basic caching principles to one of my clients so thought i would publish them.

Using a database and web application in these examples as the source, but it could be anything, but these are the most common in my experience to require the technology.

Basic Caching

The basic form of caching is simply to cache something on first request, then subsequent requests access the cached copy until it expires

cache1

Expiry is usual a fixed time, but can be sliding based on access time depending on the caching technology you are using.

Main con of this is that data updates aren’t immediate because they usually rely on expiry time.

Also your first access request is slow, if your objects are really large you might be running into webpage time outs on first load, or on first access after expiration.

Caching with Version Check

If you are caching large objects then you maybe be able to implement a versioning system, where by the objects when stored have a time-stamp or a version number. So when the user accesses the object in cache a “light weight” call can be made to compare this to tell if the cached copy is out of date, and update only in this event.

cache2

This has similar cons to above where the call that is made when the object is out of date is long.

Cache Pre-warming

If you don’t have any code in you ASPNET Global Application Start event, you should go and put some in there right now. Pre-warming anything these days is a must do, especially if you are trying to run on small VM sizes for easy scaling

Cache pre-warming is just one example, where on application start as apposed to first access you cache your data.

cache3

This can be combined with the above two methods to reduce the impact of the “long first load” issue, but when cache expires you still may get long loads to their users as their requests get used to repopulate your cache.

Application update of cache

If you have a single tier Application that runs on a single server this maybe easy, but when dealing with n-Tier applications on clusters it gets hard.

The principle is that your application will know when a data update happens, so it updates both sources, the cache and the database.

cache4

So yea, that’s easy right? when one user updates the database, we just update the cache too?

If you are using a external single source cache like redis (or something else if you are living in the nineties) then you may be able to pull this off, however if you are running on a cluster and using application cache, OR have a distribute application (e.g. a separate application to edit data, then multiple other apps read) then it can get really hard.

A few tips from Experience if you need to implement this

Use Pub/Sub

When you have multiple applications updating a reading the same data source, have them “subscribe” for updates, Azure Service Bus comes to mind as an easy way in, Redis has a good system, Signal-R is another one I’ve used in the past too, depends on your app really.

Don’t send the whole object

When using pub sub sending the whole object is going to get messy if you have a large amount of sequential updates, and may exceed your message queue data size if you have big objects, send an invalidation message. e.g. ObjectID=XYZ, so the application will know if it has Object ID XYZ in its cache it needs to go grab it again. You may even include a time-stamp so the end app can compare its time stamp and ignore subsequent messages.

Do the Cache update out-of-band with Page requests

One of the big mistakes i see made is updating cached objects in band with page requests, so you end up making some random poor sod responsible for your cache updates.

If you are using the pub sub system above you should have a thread running that’s hanging off a message queue that’ll pick up the object and update it.

Just a note on a common mistake I’ve seen made. If you are using static variables in C# to hold your data, then use a delegate to return the data to, then assign the delegate to the static variable. If you don’t it may lock the variable for the time it takes to return the data.

BAD EXAMPLE

 private static object myCachedObject;
 private void UpdateMyCache()
 {
 myCachedObject = GoGetMyData();
 }

private object GoGetMyData()

GOOD EXAMPLE


private static object myCachedObject;
private void UpdateMyCache()
{
var del=GoGetMyData()
myCachedObject = del;
}

private object GoGetMyData()
{

Generating Simple Octopus Release notes from VSO REST

One of the common issue’s I’ve had is when using octopus marking in the release notes “whats new” in this version.

Weather pushing from TeamCity or team build the issue is the same.

So here’s some powershell i use in a “PowerShell” build step in TeamCity to generate basic “Work item” plus “Change Set” lists with links through to Visual Studio Online.

You will need to add some variables into you parameters and pass them through into the script. For the from and to change set IDs you can use these two from TeamCity

%build.vcs.number% %build.vcs.number.1%

To setup Basic Auth Creds check here https://www.visualstudio.com/en-us/integrate/get-started/auth/overview


#======================
param(
[string]$account,
[string]$username,
[string]$password,
[string]$fromID,
[string]$toID
)
#======================

Write-Host "Starting Writing Release Notes"
$basicAuth = ("{0}:{1}" -f $username,$password)
$basicAuth = [System.Text.Encoding]::UTF8.GetBytes($basicAuth)
$basicAuth = [System.Convert]::ToBase64String($basicAuth)
$headers = @{Authorization=("Basic {0}" -f $basicAuth)}
$cs = Invoke-RestMethod -Uri "https://$account.visualstudio.com/DefaultCollection/_apis/tfvc/changesets?fromId=$fromID&toId=$toID&api-version=1.0" -headers $headers -Method Get

$wiIDs = @()

$releaseNotesCS=""
$releaseNotesWI=""

foreach($c in $cs.value)
{
$urlvar = $c.url
$s = Invoke-RestMethod -Uri $urlvar"?includeWorkItems=true&api-version=1.0" -headers $headers -Method Get

$releaseNotesCS += "<a href='https://$account.visualstudio.com/DefaultCollection/SOS/_versionControl/changeset/" + $s.changesetId + "'>" + $s.changesetId + "</a> " + $s.comment +"`r`n
";
Write-Host $s
foreach ($wi in $s.workItems)
{
if($wiIDs.Contains($wi.id))
{
Write-Host "In Array Already";
}
else
{
$releaseNotesWI += "<a href='" + $wi.webUrl + "'>" + $wi.id + "</a> " +$wi.title + " (" + $wi.state + ")`r`n
";
Write-Host $wi;
}
}
}

$releaseNotesWI+"
"+$releaseNotesCS | out-file ".\ReleaseNotes.html"
Write-Host "Finished Writing Release Notes"

Then in your octopus step simply set “Additional command line arguments”

–ReleaseNotesFile=ReleaseNotes.html