TeamCity Build Artifacts

Build Artifacts I find are handy for things you want to throw around on the build server, such as command line tools from open source projects, etc.

Where I would make the call over a build artifact vs a package (npm, nuget, etc.) is when it’s something that needs to be run on the developers local, i.e. packages will downlaod to both the build server and the developers local, where as a build artifact is really only designed for use on the build server.

Build Artifacts are also handy for when you need to break builds into multiple builds for stages.

We’ve got a few TFS command line tools that we use to update data in TFS from our TeamCity server, all are built from github projects, so these are good examples of a command line tool we build internally that is only used on the build server itself.

You could use build artifacts for other things as well, but I prefer for anything serious putting it into a package manager, as this allows for better version control management.

The artifact output is controlled from the General Tab in you build’s Configuration Settings.

TeamCityBuildArtifactsGeneralTab

Once you have at least one successful build run you can use the folder tab to browse the build output and pick what you need (normally in the bin\release folder).

The format you need to use is

SourceFileOrFolder1 => TargetFileOrFolder1
SourceFileOrFolder2 => TargetFileOrFolder2

You can specify a zip file for your output which i would recommend to save space. to do this you simply give it the location in the format of “MyFile.zip!/Subfolder” and it will compress your output into a folder in the zip file.

SourceFileOrFolder1 => TargetZipFile!/TargetFileOrFolder1
SourceFileOrFolder2 => TargetZipFile!/TargetFileOrFolder2

After that’s done you can run a build and check the output in the artifact tab of the completed build

TeamCityBuildArtifactOutputInCompletedBuild

Once you have this working you can then go to other builds and add this output as a dependency.

So in the other builds you will use the dependence tab, as seen below.

TeamCityBuildArtifactDependance

And you need to use s similar format to include to files into this build.

SourceArtifactFolderOrFile => TargetBuildDirOutputFodlerOrFile

Again you can also use the ! to browse inside of zip files to pull out content

TeamCityBuildArtifactDepedancyAddNew.PNG

in the above example if will have the command line app i need in the build output folder under the TfsCreateBuildCmd folder.

So I can now add a build step that calls this command using “TfsCreateBuildCmd\TfsCreateBuild.exe” to call the command and do something.

And it’s that easy 🙂


Startup/Shutdown VMs in Azure after hours – Gotchas

A few of our VMs (Dev/test servers) don’t need to be on overnight so we have some scripts to shut them down. This is a little bit tricky in Azure because of the runbook credentials. These are easy to create, a good post here about it. But in all the articles I’ve read, no one mentions that the passwords in Azure AD expire, so every 90 days or so you have to go in and rest your passwords.

Another gotcha I ran into was that with the run books, errors don’t make them fail, only exceptions do. So i had to check for error states and throw.

So when my automation user’s credentials expired and started throwing errors, I got no alerts about this. Until that was, someone read that months bill 🙂

AzureRunbookStatusCompleteButErrorFromScript

So I’ve put together a little post on how to work around these as it’s not easy.

First of all, lets assume you have followed the above post already and have automation credentials already.

You then need to use powershell to set the user’s password to never expire. To do this you need download and install the following.

  1. Microsoft Online Services Sign-In Assistant for IT Professionals RTW
  2. Windows Azure Active Directory Module for Windows PowerShell 

After that you can use the following PowerShell script from you local to set the user’s password never to expire

WARNING: You cannot use a Microsoft LIVE account to run this script, you need to use an organisational account.


Import-Module MSOnline
# you cannot login with a LVIE account, it must be an organisational account
Connect-MsolService
Set-MsolUser -UserPrincipalName "myaccount@myorg.onmicrosoft.com" -PasswordNeverExpires $true

Now below is my shutdown and startup scripts that i set on a Schedule, with error detection for common errors in them

workflow shutdown
{
$Cred = Get-AutomationPSCredential -Name 'MyAutomationCred'

$a = Add-AzureAccount -Credential $Cred -ErrorAction Stop
if ($a.Subscriptions) {
Write-Output 'User Logged in'
} else {
throw 'User logged in with no subscriptions'
}
InlineScript
{
Select-AzureSubscription 'MySubscription'
#Array of server names here
$VMS = "web02","web03"
ForEach ($VM in $VMS)
{
$aVM = get-azurevm $VM
if($aVM -eq $null)
{
throw "Unable to get VM, check permissions perhaps?"
}
$VMName = $aVM.Name
Write-Output "Attempting to stop VM: $VMName"
Stop-AzureVM -ServiceName $aVM.ServiceName -StayProvisioned $true -Name $aVM.Name
}
}
}


workflow startup
{
$Cred = Get-AutomationPSCredential -Name 'MyAutomationCred'

$a = Add-AzureAccount -Credential $Cred -ErrorAction Stop
if ($a.Subscriptions) {
Write-Output 'User Logged in'
} else {
throw 'User logged in with no subscriptions'
}
InlineScript
{
Select-AzureSubscription 'MySubscription'
#Array of server names here
$VMS = "web02","web03"
ForEach ($VM in $VMS)
{
$aVM = get-azurevm $VM
if($aVM -eq $null)
{
throw "Unable to get VM, check permissions perhaps?"
}
$VMName = $aVM.Name
Write-Output "Attempting to start VM: $VMName"
Start-AzureVM -ServiceName $aVM.ServiceName -Name $aVM.Name
}
}
}

You will note the checks and throws as Errors are ignored by the runbook.


Sharing files between Visual Studio projects, where the file is included in the project

We have a standard deployment script that runs within the scope of the web app. It’s an Octopus PreDeploy.ps1 script. It uses things like the name of the project to make decisions about what to call the user account on the app pool, the web site name, the app pool name, etc. There is a few things we haven’t that can’t be covered by the standard octopus IIS step (e.g. one is that we deploy our web services to a versioned url, https://myservivce.com/v1.1/endpoint/).

If you are starting from scratch I might be inclined to not do what we did, and instead start from using separate steps for this, the new features in Octopus 3.3 support storing a script in a package that you could use for this.

So to share this between our projects we decided to put it into a nuget package and install it that way, this means though that we need to treat it like content, and not a dll, but it needs to be included in the project, so that octopack will bundle it up into the package.

To do this we created an install.ps1 and uninstall.ps1 files to include the files from the nuget package as a linked item in the visual studio project.

So the nuspec file needed to be modified as follows.

You will note the target of the (un)install files is set to tools, this will make them get executed by visual studio. And our file we want to add is added in the root.


<files>
<file src="PreDeploy.ps1" target="." />
<file src="install.ps1" target="tools" />
<file src="uninstall.ps1" target="tools" />
</files>

Then the install.ps1 file looks as follows.

You will note it uses MS Build libraries in the powershell to execute inside of visual studio. This allows us to use the handy “GetItems” method on the project, and return all content items, so we can check for previous versions and remove.

It needs to be a content item because octopack will only package content items out of the box.

This is further filtered for items which have the packge name in the path (e.g. it would look something like this “packges\MyDeploymentPackage\predeploy.ps1″). If you had multiple files to add you could use an array here to remove all files isntead of one.

We store this in a delegate because we can’t call remove mid loop (you’ll get an error), then remove after the loop has completed.

Then prepare a new content item and save it into the project. You could do a dir listing on that folder and add all files, if you wanted to do multiple.


param
(
$installPath,
$toolsPath,
$package,
$project
)
$predeployfilename = "predeploy.ps1"
# Need to load MSBuild assembly if it's not loaded yet.
Add-Type -AssemblyName 'Microsoft.Build, Version=4.0.0.0, Culture=neutral, PublicKeyToken=b03f5f7f11d50a3a'

# Grab the loaded MSBuild project for the projectcontent
$buildProject = [Microsoft.Build.Evaluation.ProjectCollection]::GlobalProjectCollection.GetLoadedProjects($project.FullName) | Select-Object -First 1

Write-Host ("Adding $predeployfilename into project " + $project.Name);
$PackName = $package.id;
Write-Host '$package.id' = $package.id
$nodeDeligate = $null

$buildProject.GetItems('Content') | Where-Object { $_.EvaluatedInclude -match $PackName } | ForEach-Object {
Write-Host "Removing Previous $predeployfilename Item"
$nodeDeligate = $_;
}

Write-Host '$nodeDeligate' = $nodeDeligate
if($nodeDeligate -ne $null)
{
$buildProject.RemoveItem($nodeDeligate);
Write-Host ("Removing old item: " + $predeployfilename);
}

$projectItem = Get-ChildItem $project.FullName;
$predeployfile = Resolve-Path ($installPath + "\" + $predeployfilename);
Set-Location $projectItem.Directory
$predeployrel = Get-Item $predeployfile | Resolve-Path -Relative

# For linked items the Include attribute is the relative path to that item, and the Link subproperty is the local display name.
$metadata = New-Object 'System.Collections.Generic.Dictionary[System.String, System.String]';
$metadata.Add('Link', $predeployfilename);

$target = $buildProject.AddItem("Content", $predeployrel, $metadata);

$buildProject.Save();
$buildProject.ReevaluateIfNecessary();

Write-Host ("$predeployfilename added.");

The uninstall.ps1 looks the same except it only has the step to remove not add. And its that easy!

Also to note that the contentFiles feature in nuget 3.3 which is not support by Visual studio yet may solve this too, i haven’t see it in action yet.


Use Parameters from TFS Test Cases in NUnit Unit Tests

One of the things we have been doing a lot lately is getting our testers involved more in API method creation/development. With technologies like swagger this is becoming a lot easier to get non-developers involved at this level, and I find its great to have a “test driven” mind helping developers out with creating unit tests at a low level like this.

One of our problems though is that the testers have been coming up with test cases fine, but getting them into our code has been a mission.

Our testers know enough code to have a conversation about code, look at some basic loops and ifs, but not enough to edit it, so in some cases we’ve been having Chinese whisper issues in getting the cases into the code. Also we have had some complex test methods recently (10+ parameters, 30+ test cases) and storing these into C# code its hard to visualize when look at code and not something like a grid/table (excel, etc.).

For the later requirement we had considered CSV storage, and I have done some code for this in my library for use if you want it. But we decide to go with TFS test cases for storing the data, because i was working on updating the Test Cases from the NUnit tests anyway .

Ideally i wanted to do something like this:


 [Test]
 [TfsTestCaseDataSource(65871)]
 public void MyUnitTestMethod()
 {
 // Test stuff here
 }

And have it draw from the test case in TFS (example below).

TestCaseInTFSStoringDataToUseInUnitTestNUnit

However there is some issues with passing parameters to NUnit Tests that prevented me from doing this.

So instead what we have to do is create a class for each Unit Test we want to get its Data from a Test Case in TFS. This is the current work around. I may yet fix this in NUnit one weekend if I am not too hungover (but there is little change of a weekend like this).

Library I am using here is available on nuget.org

So using the library you have to do the following

1. Create a class for the data source that inherits from the Class in NUnitTfsTestCase.TestCaseData.TestCaseDataTfs Hard code your TFS test case ID in here


using System.Collections.Generic;
using NUnitTfsTestCase.TestCaseData;

namespace MyNamespace.MyFixture.MyMethod // use a good folder structure please 🙂
{
 class GetTestCaseData : TestCaseDataTfs
 {
 public static IEnumerable<dynamic> GetTestData()
 {
 return TestCaseDataTfs.GetTestDataInternal(65079);
 }
 }
}

2. Add an attribute to you test case that references this


[TestFixture]
class MyTestClass
{

[Test]
[Test, TestCaseSource(typeof(MyFixture.MyMethod.GetTestCaseData), "GetTestData")]
public void MyUnitTestMethod(strin someParam1, string someParam2)
{
// Test stuff here
}
}

3. Add app-settings for the TFS server and TFS project name


<add key="tpcUri" value="https://mytfsserver.com.au/tfs/DefaultCollection" />
<add key="teamProjectName" value="MyProjectName" />

Its important to note here that I am using a build agent that is on the same domain as an on-premise TFS server using a Domain account with appropriate permissions to the TFS server. I will work on example code in the near future for this hit VSTS (formally VSO) with credentials baked into the appSettings.

Another thing to note is that NUnit pulls out data and sends it to the parameter using ordinals. so you need to make sure the column parameter data in TFS is in the correct order as the parameters in the unit test method. I think i should be able to fix this though so it matches the parameters on the method to the Columns in TFS, I’ll have another crack in a few weeks.

The source code for the library is available here. Feel free to send a PR if you want to improve or fix anything 🙂


Updating Test Cases in TFS from NUnit Tests run in TeamCity Builds

One of the things i always try to impress upon business is the need for a dashboards, and TFS provides a great interface for this. We use them to report on our manual testing, and we were looking at also using them to report on test automation.

I’ve seen CodedUI test results in the past update the test from links to test automation via test manager. I thought we might be able to use this but its pretty hard, instead I just used the TFS Client (old one, not the new REST client unfortunately, will revise code in another post). Below is the final outcome I wanted to end up with on Out dashboard:

TFSDashboardTestcaseStatusForUnitTest

The concept is pretty straight forward, we wanted to achieve something like the following with our NUnit units Tests:


[Test]
[TfsTestCase(65871)]
public void MyUnitTestMethod()
{
// Test stuff here
}

So we could simply add an attribute to the Unit test with the ID of the test case and the library would take care of the rest. And its “almost” that easy.

In order to log test results you also need to Test Suite ID and the Test Plan ID from TFS, and we need to initialize the run at the start, then close it at the end so we end up with all of our units tests in the same run (I’ve done one run per fixture but you could change this).

So in the library there is two static int that need to be set and I also created a “Test Rig” class that I inherit my test Fixtures from that have the appropriate OneTimeSetup and OneTimeTearDown methods to start the test run, then close it off.

There is also some static variables for caching all the test results and adding them in one go at the end (I couldn’t work out how to add them as they are running).

The end result is something like the below:


[TestFixture]
class MyTestClass : ControllerTestRig
{
public MyTestClass () //ctor for setting static vars, runs before OneTimeSetup
{
NUnitTfsTestCase.TfsService.RunData.TestPlanId = 65213;
NUnitTfsTestCase.TfsService.RunData.TestSuiteId = 65275;
}

[Test]
[TfsTestCase(65871)]
public void MyUnitTestMethod()
{
// Test stuff here
}
}

It’s important to note at this stage that this library assumes that your Build Agent has authentication with your TFS server. In our first case for this we are using on-premise TFS and a Build Agent that is running under a domain windows user account with the correct permissions. I will do an update later for different auth methods, and also do an example for VSTS (Formally VSO), as I am going to move this over to a VSTS hosted project in the next few weeks.

Also you need to put the following app settings in for the library to pick up your TFS server address and project name

<add key="tpcUri" value="https://mytfsserver.com.au/tfs/DefaultCollection" />
<add key="teamProjectName" value="MyProjectName" />

Once the above is done we now get a nice test run for each Test Fixture in our Test library, as well as the test cases having their status get updated.

TFSTestRunCharts

TFSTestRunDetailsFromTeamCityNUnitRun

Any test that error it will pass on the error status and also the message. We are using NUnit 3 for this, because 2.x isn’t under active development and doesn’t provide a lot of detail in the TestContext for use to log to TFS.

The source code is available on GitHub here and the nuget package is available on nuget.org. Feel free to send a PR if you want to change or fix something!


Swagger WebAPI JSON Object formatting standards between C#, TypeScript and Others

When designing objects in C# you use pascal casing for your properties, but in other languages you don’t, and example (other than java) is TypeScript here’s an article from Microsoft about it.

And that’s cool, a lot of the languages have different standards and depending on which one you are in, you write a little different.

The problem is when you try to work on a standard that defines cross platform communication that is case sensitive, an example being Swagger using REST and JSON.

So the issue we had today was a WebAPI project was generating objects like this:


{
"ObjectId": 203
"ObjectName" : "My Object Name"
}

When swaggerated the object comes out correctly with the correct pascal casing, however when using swagger codegen the object is converted to camel case (TypeScript Below)


export interface MyObject {
 objectId: number;
 objectName: string;
}

The final output is a generated client library that can’t read any objects from the API because JavaScript is case sensitive.

After some investigation we found that when the swagger outputs camel casing the C# client generators (Autorest and Swagger codegen) will output C# code that is in camel casing but with properties to do the translating from camel to pascal, like the below example


/// <summary>
/// Gets or Sets TimeZoneName
/// </summary>
[JsonProperty(PropertyName = "timeZoneName")]
public string TimeZoneName { get; set; }

So to avoid pushing shit up hill we decided to roll down it. I found this excellent article on creating a filter for WebAPI to convert all your pascal cased objects to camel case on the fly

So we found that the best practice is:

  • Write Web API C# in Pascal casing
  • Covert using an action filter from pascal to camel case Json objects
  • Creating the client with TyepScript (or other camel language) default option will then work
  • Creating the C# client will add the JsonProperty to translate from camel to pascal and resulting C# client will be pascal cased

I raised a GitHub Issue here with a link into the source code that I found in swagger codegen, however later realized that changing the way we do things will mitigate long term pain.

Automated SSRS Report Deployments from Octopus

Recently we started using the SQL Data Tools preview in 2015, its looking good so far, for the first time in a long time I don’t have to “match” the visual studio version I’m using with SQL, i can use the latest version of VS and support SQL version from 2008 to 2016, which is great, but it isn’t perfect. There is a lot of bugs in the latest version of data tools and some that Microsoft are refusing to fix that affect us.

One of the sticking points for me has always been deployment, we use octopus internally for deployment and try to run everything through that if we can to simplify our deployment environment.

SSRS is the big one, so I’m going to go into how we do deployments of that.

We use a tools in SQL called RS.EXE this is a command line tool that pre-installs with SSRS for running vb scripts to deploy reports and other objects in SSRS.

You need to be aware with this tool though that based on which API endpoint you call using the “-e” command line parameter, that the methods will be different. And out of the box it defaults to calling the 2005 endpoint, which has massive changes to 2010.

A lot of the code i wrote was based on Tom’s Blog Post on the subject in 2011, however he was using the 2005 endpoint and I have updated the code to use the 2010 end point.

The assumption is that you will have a folder full of RDL files (and possibly some pngs and connection objects) that you need to deploy, so the VB script takes a parameters of a “source folder”, the “target folder” on the SSRS server, and the “SSRS server address” itself. I package this into a predeploy.ps1 file that I package up into a nuget file for octopus, the line in the pre-deploy script looks like the below.


rs.exe -i Deploy_VBScript.rss -s $SSRS_Server_Address -e Mgmt2010 -v sourcePATH="$sourcePath"   -v targetFolder="$targetFolder"

You will note the “-e Mgmt2010” this is important for the script to work, next is the Deploy_VBScript.rss


Dim definition As [Byte]() = Nothing
Dim warnings As Warning() = Nothing
Public Sub Main()
' Create Folder for the project if not exist
try

Dim descriptionProp As New [Property]
descriptionProp.Name = "Description"
descriptionProp.Value = ""
Dim visibleProp As New [Property]
visibleProp.Name = "Visible"
visibleProp.value = True
Dim props(1) As [Property]
props(0) = descriptionProp
props(1) = visibleProp
If targetFolder.SubString(1).IndexOf("/") <> -1 Then
Dim level2 As String = targetFolder.SubString(targetFolder.LastIndexOf("/") + 1)
Dim level1 As String = targetFolder.SubString(1, targetFolder.LastIndexOf("/") - 1)
Console.WriteLine(level1)
Console.Writeline(level2)
rs.CreateFolder(level1,"/", props)
rs.CreateFolder(level2 , "/"+level1, props)
Else
Console.Writeline(targetFolder.Replace("/", ""))
rs.CreateFolder(targetFolder.Replace("/", ""), "/", props)
End If
Catch ex As Exception
If ex.Message.Indexof("AlreadyExists") > 0 Then
Console.WriteLine("Folder {0} exists on the server",targetFolder)
else
throw ex
End If
End Try
Dim Files As String()
Dim rdlFile As String
Files = Directory.GetFiles(sourcePath)
For Each rdlFile In Files
If rdlFile.EndsWith(".rds") Then
'TODO Implment handler for RDS files
End If
If rdlFile.EndsWith(".rsd") Then
'TODO Implment handler for RSD files
End If
If rdlFile.EndsWith(".png") Then
Console.WriteLine(String.Format("Deploying PNG file {2} {0} to folder {1}", rdlFile, targetFolder, sourcePath))
Dim stream As FileStream = File.OpenRead(rdlFile)
Dim x As Integer = rdlFile.LastIndexOf("\")

definition = New [Byte](stream.Length) {}
stream.Read(definition, 0, CInt(stream.Length))
Dim fileName As String = rdlFile.Substring(x + 1)
Dim prop As new [Property]
prop.Name ="MimeType"
prop.Value="image/png"
Dim props(0) as [Property]
props(0)=prop
rs.CreateCatalogItem("Resource",fileName,targetFolder,True,definition,props,Nothing)
End If
If rdlFile.EndsWith(".rdl") Then
Console.WriteLine(String.Format("Deploying report {2} {0} to folder {1}", rdlFile, targetFolder, sourcePath))
Try
Dim stream As FileStream = File.OpenRead(rdlFile)
Dim x As Integer = rdlFile.LastIndexOf("\")

Dim reportName As String = rdlFile.Substring(x + 1).Replace(".rdl", "")

definition = New [Byte](stream.Length - 1) {}
stream.Read(definition, 0, CInt(stream.Length))

rs.CreateCatalogItem("Report",reportName, targetFolder, True, definition, Nothing, warnings)
If Not (warnings Is Nothing) Then
Dim warning As Warning
For Each warning In warnings
Console.WriteLine(warning.Message)
Next warning
Else
Console.WriteLine("Report: {0} published successfully with no warnings", reportName)
End If
Catch e As Exception
Console.WriteLine(e.Message)
End Try
End If

Next
End Sub

I haven’t yet added support for RDS and RSD files to this script. If someone wants to finish it off please share. Now its running PNGs and RDLs which is the main thing we update.

Now that all sounds too easy, and it was, the next issue i ran into was this one when deploying. The VS 2015 Data Tools client saves everything in 2016 format, and when I say 2016 format, i mean it changes the xmlns and adds a tag called “ReportParametersLayout”.

When you deploy from the VS client it appears to “rollback” these changes before passing the report to the 2010 endpoint, but if you try to deploy the RDL file from source it will fail (insert fun).

To work around this I had to write my own “roll back” script in the octopus pre-deploy powershell script, below:

Get-ChildItem $sourcePath -Filter "*.rdl" | `
Foreach-Object{
[Xml]$xml = [xml](Get-Content $_.FullName)
if($xml.Report.GetAttribute("xmlns") -eq "http://schemas.microsoft.com/sqlserver/reporting/2016/01/reportdefinition")
{
$xml.Report.SetAttribute("xmlns","http://schemas.microsoft.com/sqlserver/reporting/2010/01/reportdefinition")
}
if($xml.Report.ReportParametersLayout -ne $null)
{
$xml.Report.RemoveChild($xml.Report.ReportParametersLayout)
}
$xml.Save($sourcePath + '\' + $_.BaseName + '.rdl')
}

Now things were deploying w… no, wait! there’s more!

Another error I hit was this next one, I mentioned before MS are refusing to fix some bugs here’s one. We work in Australia, so Time Zones are a pain in the ass, we have some states on daylight savings, some not, and some that were that have now stopped. Add to this we work on a multi-tenanted application, so while some companies rule “We are in Sydney time, end of story” we cannot. So using the .NET functions for timezone conversion is a must as they take care of all this nonsense for you.

I make a habit of storing all date/time data in UTC that way in the database or application layer if you need to do a comparison its easy, then i convert to local timezone in the UI based on user preference or business rule, etc. Its because of this we have been using System.TimezoneInfo in the RDL files. As of VS 2012 and up, you get an error from this library in VS, the report will still run fine on SSRS when deployed, it just errors in the Editor in VS and wont preview or deploy.

We’ve worked around this by using a CLR function that wraps TimezonInfo example here. If you are reading this please vote this one up on connect, converting timezone in the UI is better.

After this fix things are running smoothly.


AutoRest, Swagger-codegen and Swagger

One of the best things about swagger is being able to generate a client. For me swagger is for REST what WSDL was for SOAP, one of my big dislikes about REST from the start was it was hard to build clients because the standard was so lose, and most services if you got one letter’s casing wrong in a large object it would give you a generic 400 response with no clue as to what the actual problem might be.

Enter Swagger-codegen, Java based command line app for generating proxy clients based on the swagger standard. Awesomesuace! However I’m a .NET developer and I try to avoid adding new dependencies into my development environment (Like J2SE), that’s ok though, they have a REST API you can use to generate the clients as well.

In working on this though I found that MS is also working on their own version of codegen, called AutoRest. AutoRest only support 3 output formats at the moment though, Ruby, Node.js (TypeScript) and C#, But looking at the output from both and comparing them, I am much happier with the AutoRest outputted code, its a lot cleaner.

So in our case we have 3 client requirements C#, Client Side javascript, and Client Side Typescript.

Now either way you go with this, one requirement is you need to be able to “run” your WebAPI service on a web server to generate the json swagger file that will be used in the client code generation. So you could add it into a CI pipeline with your Web API but you would need to do build steps like

  1. Build WebAPI project
  2. Deploy Web API project to Dev server
  3. Download json file from Dev Server
  4. Build client

Or you could make a separate build that you run, I’ve tried both ways and it works fine.

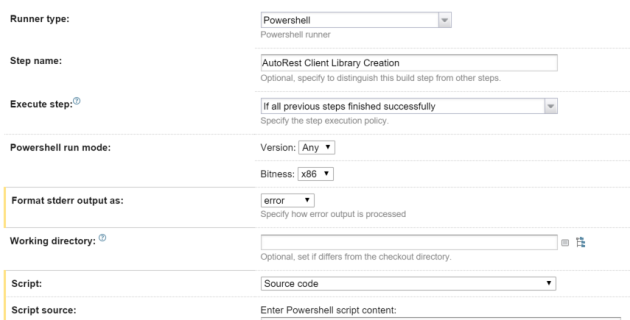
So we decided to use AutoRest for the C# client. This was pretty straight forward, the autorest exe if available in a nuget package. So for our WebAPI project we simply added this, which made it available and build time. Then it was simply a matter of adding a PowerShell step into TeamCity for the client library creation. AutoRest will output a bunch of C# cs file that you will need to compile, which is simply a mater of using the csc.exe, after this I copy over a nupsec file that i have pre-baked for the client library.

PowerShellAutoRestStepTeamCity


.\Packages\autorest.0.13.0\tools\AutoRest.exe -OutputDirectory GeneratedCSharp -Namespace MyWebAPI -Input http://MyWebAPI.net/swagger/docs/v1 -AddCredentials
& "C:\Program Files (x86)\MSBuild\14.0\bin\csc.exe" /out:GeneratedCSharp\MyWebAPI.Client.dll /reference:Packages\Newtonsoft.Json.6.0.4\lib\net45\Newtonsoft.Json.dll /reference:Packages\Microsoft.Rest.ClientRuntime.1.8.2\lib\net45\Microsoft.Rest.ClientRuntime.dll /recurse:GeneratedCSharp\*.cs /reference:System.Net.Http.dll /target:library
xcopy MyWebAPI\ClientNuspecs\CSharp\MyWebAPI.Client.nuspec GeneratedCSharp

You will note form the above command lines for csc that I have had to add in some references to get it to compile, these need to go into your nuspec file as well, so people installing your client package will have the correct dependencies. Snip from my nuspec file below:


<frameworkAssemblies>
<frameworkAssembly assemblyName="System.Net.Http" targetFramework="net45" />
</frameworkAssemblies>
<dependencies>
<dependency id="Microsoft.Rest.ClientRuntime" version="1.8.2" />
<dependency id="Newtonsoft.Json" version="6.0.8" />
</dependencies>

After this just add a Nuget Publish step and you can start pushing your library to nuget.org, or in out case just our private internal server.

For authentication we use Basic Auth over SSL, so adding the “-AddCredentials” command line parameter is needed to generate the extra methods and properties for us, you may or may not need this.

Below is an example console app where I have installed the nuget package that autorest created, this uses basic auth which you my not need.

namespace ConsoleApplication1
{
class Program
{
static void Main(string[] args)
{
var svc = new MyClient();
svc.BaseUri = new Uri("https://MyWebAPILive.com");
svc.Credentials= new BasicAuthenticationCredentials{UserName = "MyUser",Password = "MyPassword!"};
Console.WriteLine(svc.HelloWorld());
Console.ReadLine();
}
}
}

Next we have swagger codegen for our Client libraries. As I said before I don’t want to add J2SE into our build environment to avoid complexity, so we are using the API. I’ve built a gulp job to do this.

Why gulp? the javascript client output from codegen is pretty rubbish, so instead of using this I’m getting the typescript library and compile it, then minify, i find this easier to do in gulp.

The Swagger UI for the Swagger Codegen api is here. When you call the POST /gen/clients method you pass in your json file, after this it returns a URL back that you can use to then download a zip file with the client package. Below is my gulpfile

var gulp = require('gulp');
var fs = require('fs');
var request = require('request');
var concat = require('gulp-concat');
var unzip = require('gulp-unzip');
var ts = require('gulp-typescript');
var tsd = require('gulp-tsd');
var tempFolder = 'temp';

gulp.task('default', ['ProcessJSONFile'], function () {
// doco https://generator.swagger.io/#/
});

gulp.task('ProcessJSONFile', function (callback) {
return request('http://MyWebAPI.net/swagger/docs/v1',
function (error, response, body) {
if (error != null) {
console.log(error);
return;
}
ProcessJSONFileSwagOnline(body);
});
});

function ProcessJSONFileSwagOnline(bodyData) {
bodyData = "{\"spec\":" + bodyData + "}"; // Swagger code Gen web API requires the output be wrapped in another object
return request({
method: 'POST',
uri: 'http://generator.swagger.io/api/gen/clients/typescript-angular',
body: bodyData,
headers: {
"content-type": "application/json"
}
},
function (error, response, body) {
if (error) {
console.log(error);
return console.error('upload failed:', error);
}
var responseData = JSON.parse(body);
var Url = responseData.link;
console.log(Url);
downloadPackage(Url);
});
};

function downloadPackage(Url) {
return request(Url,
function(error, response, body) {
console.log(error);
}).pipe(fs.createWriteStream('client.zip'), setTimeout(exctractPackage,2000));
};

function exctractPackage() {
gulp.src("client.zip")
.pipe(unzip())
.pipe(gulp.dest(tempFolder));
setTimeout(moveFiles,2000);
};

function moveFiles() {
return gulp.src(tempFolder + '/typescript-angular-client/API/Client/*.ts')
.pipe(gulp.dest('generatedTS/'));
};

Now I am no expert at Node.js I’ll be the first to admit, so I’ve added a few work arounds using setTimeout in my script as I could get the async functions to work correctly, if anyone wants to correct me on how these should be done properly please do 🙂

At the end of this you will end up with the type script files in a folder that you can then process into a package. We are still working on a push to GitHub for this so that we can compile a bower package for us, I will make another blog post about this.

In the typescript output there will always be a api.d.ts file that you can reference into your TypeScript project to expose the client. I’ll do another post about how we setup or Dev Environment for compile the TypeScript from bower packages.

for our Javascript library we just need to add one more step.


function compileTypeScriptClientLib() {
var sourceFiles = [tempFolder + '/**/*.ts'];

gulp.src(sourceFiles)
.pipe(ts({
out: 'clientProxy.js'
}))
.pipe(gulp.dest('outputtedJS/'));
};

This will compile us our JS script library, we can then also minify it in gulp as well, before packaging, again bower is the technology for distributing client packages, so after this we push to GitHub, but i’ll do another blog post about that.

The output you get from TypeScript in CodeGen is angularJS, which is fine as “most” of our apps use angular already, however a couple of our legacy ones don’t, so the client proxy object that is created needs a bit of work to inject it’s dependencies.

Below is an example of a module in javascript that I use to wrap the AngularJS service and return it as a javascipt object with the Angular Dependencies injected:


var apiClient = (function (global) {
var ClientProxyMod= angular.module("ClientProxyMod", []);
ClientProxyMod.value("basePath", "http://MyWebAPILive.com/"); // normally I'd have a settings.js file where I would store this
ClientProxyMod.service("MyWebAPIController1", ['$http', '$httpParamSerializer', 'basePath', API.Client.MyWebAPIController1]);
var prx = angular.injector(['ng', 'ClientProxyMod']).get('MyWebAPIController1');
return {
proxy: prx
}
}());

You would need to do the above once for each controller you have in your WebAPI project, the codegen outputs one service for each controller.

One of the dependencies of the Service that is created by CodeGen is the “basePath” this is the URL to the live service, so i pass this in as a value, you will need to add this value to your Angular JS module when using in an Angular JS app as well.

Using basic auth in AngularJS is pretty straight forward because you can set it on the $http object which is exposed as a property on the service.


apiClient.proxy.$http.defaults.headers.common['Authorization'] = "Basic " + btoa(username + ":" + password);

Then you can simply call your methods from this apiClient.proxy object.


Swagger/Swashbuckle displaying Error with no information

Ran into a interesting problem today when implementing swagger UI on one of our WebAPI 2 projects.

Locally it was working fine. But when the site was deployed to dev/test it would display an ambiguous error message

<Error>
<Message>An error has occurred.</Message>
</Error>

After hunting around I found that swashbuckle respects the customErrors mode in the system.web section of the web config.

Setting this Off displayed the real error, in our case a missing dependency

<system.web>
<customErrors mode="Off"/>
</system.web>


<Error>
<Message>An error has occurred.</Message>
<ExceptionMessage>
Could not find file 'C:\Octopus\Applications\Development\Oztix.GreenRoom.WebAPI\2.0.332.0\Oztix.GreenRoom.WebAPI.XML'.
</ExceptionMessage>
<ExceptionType>System.IO.FileNotFoundException</ExceptionType>
<StackTrace>
at System.IO.__Error.WinIOError(Int32 errorCode, String maybeFullPath) at System.IO.FileStream.Init(String path, FileMode mode, FileAccess access, Int32 rights, Boolean useRights, FileShare share, Int32 bufferSize, FileOptions options, SECURITY_ATTRIBUTES secAttrs, String msgPath, Boolean bFromProxy, Boolean useLongPath, Boolean checkHost) at System.IO.FileStream..ctor(String path, FileMode mode, FileAccess access, FileShare share, Int32 bufferSize, FileOptions options, String msgPath, Boolean bFromProxy) at System.IO.FileStream..ctor(String path, FileMode mode, FileAccess access, FileShare share, Int32 bufferSize) at System.Xml.XmlUrlResolver.GetEntity(Uri absoluteUri, String role, Type ofObjectToReturn) at System.Xml.XmlTextReaderImpl.OpenUrlDelegate(Object xmlResolver) at System.Threading.CompressedStack.runTryCode(Object userData) at System.Runtime.CompilerServices.RuntimeHelpers.ExecuteCodeWithGuaranteedCleanup(TryCode code, CleanupCode backoutCode, Object userData) at System.Threading.CompressedStack.Run(CompressedStack compressedStack, ContextCallback callback, Object state) at System.Xml.XmlTextReaderImpl.OpenUrl() at System.Xml.XmlTextReaderImpl.Read() at System.Xml.XPath.XPathDocument.LoadFromReader(XmlReader reader, XmlSpace space) at System.Xml.XPath.XPathDocument..ctor(String uri, XmlSpace space) at Swashbuckle.Application.SwaggerDocsConfig.<>c__DisplayClass8.<IncludeXmlComments>b__6() at Swashbuckle.Application.SwaggerDocsConfig.<GetSwaggerProvider>b__e(Func`1 factory) at System.Linq.Enumerable.WhereSelectListIterator`2.MoveNext() at Swashbuckle.Swagger.SwaggerGenerator.CreateOperation(ApiDescription apiDescription, SchemaRegistry schemaRegistry) at Swashbuckle.Swagger.SwaggerGenerator.CreatePathItem(IEnumerable`1 apiDescriptions, SchemaRegistry schemaRegistry) at System.Linq.Enumerable.ToDictionary[TSource,TKey,TElement](IEnumerable`1 source, Func`2 keySelector, Func`2 elementSelector, IEqualityComparer`1 comparer) at Swashbuckle.Swagger.SwaggerGenerator.GetSwagger(String rootUrl, String apiVersion) at Swashbuckle.Application.SwaggerDocsHandler.SendAsync(HttpRequestMessage request, CancellationToken cancellationToken) at System.Net.Http.HttpMessageInvoker.SendAsync(HttpRequestMessage request, CancellationToken cancellationToken) at System.Web.Http.Dispatcher.HttpRoutingDispatcher.SendAsync(HttpRequestMessage request, CancellationToken cancellationToken) at System.Web.Http.HttpServer.<SendAsync>d__0.MoveNext()
</StackTrace>
</Error>

Application Insights, and why you need them

Metrics are really important for decision making. To often in business I hear people make statements based on assumptions, followed by justifications like “It’s an educated guess”, if you want to get educated you should use metrics to get your facts first.

Microsoft recently published a great article (From Agile to DevOps at Microsoft Developer Division) about how they changed their agile processes, and one of the key things I took out of it was the change away from the product owner as the ultimate source of information.

A tacit assumption of Agile was that the Product Owner
was omniscient and could groom the backlog correctly…

… the Product Owner ranks the Product Backlog Items (PBIs) and these are treated more or less as requirements. They may be written as user stories, and they may be lightweight in form, but they have been decided.

We used to work this way, but we have since developed a more flexible and effective approach.In keeping with DevOps practices, we think of our PBIs as hypotheses. These hypotheses need to be turned into experiments that produce evidence to support or diminish the experiment, and that evidence in turn produces validated learning.

So you can use metrics to validate your hypotheses and make informed decision about the direction of your product.

If you are already in azure its easy and free for most small to mid-sized apps. You can do pretty similar things with google analytics too, but the reason i like the App Insights is it combines server side monitoring and also it works nicely with the Azure dashboard in the new portal, so i can keep everything in once place.

From Visual studio you can simply right click on a project and click “Add Application Insight Telemetry”

AddApplicaitonInsightsWebProject

This will bring up a wizard that will guide you through the process.

AddApplicaitonInsightsWizard1.PNG

One gotcha i found though was that because my account was linked to multiple subscriptions i had to cancel out of the wizard, then login with the server explorer then go through the wizard again.

It adds a lot of gear to your projects including

  • Javascript libraries
  • Http Module for tracking requests
  • Nuget packages for all the ApplicaitonInsights libraries
  • Application insights config file with the Key from your account

After that’s loaded in you’ll also need to add in tracking to various areas, the help pages in the azure interface have all the info for this and come complete with snippets you can easily copy and paste for a dozen languages and platforms (PHP, C#, Phyton, Javascript, etc) but not VB in a lot of instances which surprised me 🙂 you can use this link inside the Azure interface to get at all the goodies you’ll need

HelpAndCodeSnippetsApplicationInsights

Where I recommend adding tracking at a minimum is:

Global.ascx for web apps


public void Application_Error(object sender, EventArgs e)
{
// Code that runs when an unhandled error occurs

// Get the exception object.
Exception exc = Server.GetLastError;

log.Error(exc);
dynamic telemetry = new TelemetryClient();
telemetry.TrackException(exc);
Server.ClearError();

}

Client side tracking copy the snippet from their interface

Add to master page or shared template cshtml for MVC.

GetClientSideScriptCode


Also you should load it onto your VMs as well, there is a web platform installer you can run on your windows boxes that will load a service on for collecting the stats.

WebPlatformApplicationIsightInstaller

InstallApplicaitionInsightsWindowsServer

Warning though that the above needs a IISReset to complete. A good article on the setup is here.

For tracking events I normally create a helper class that wraps all my calls to make things easier.

Also as a lot of my apps these days are heavy JavaScript I’m using the tracking feature in JavaScript a lot more. The snippet they give you will create a appInsights object in the page you can reuse through your app after startup.

Below is an example drawn from code I put into a survey App recently, not exactly the same code but I will use this as an example. This is so we could track when a user answers a question incorrectly (i.e. validation fails), there is a good detailed article on this here

appInsights.trackEvent("AnswerValidationFailed",
{
SurveyName: "My Survey",
SurveyId: 22,
SurveyVersion: 3,
FailedQuestion: 261
});

By tracking this we can answer questions like

  • Are there particular questions that users fail to answer more often
  • Which surveys have a higher failure rate for data input

Now that you have the ability to ask these questions you can start to form hypotheses. For example i make make a statement like;

“I think Survey X is too complicated for users and needs to be split into multiple smaller surveys”

To validate this I could look at the metrics collected for the above event for the user error rate on survey X compare to other surveys and use this as a basis for my hypotheses. You can sue the metrics explorer to create charts that map this out for you, filtering by you event (example below)

MetricExplorerEventFilter

Then after the change is complete I can use the same metrics to measure the impact of my change.

This last point is another mistake I see in business a lot, too often changes is made, then no one reviews success. What Microsoft have done with their “Dev Ops” process embeds into their metrics into the process. So by default you are checking your facts before and after change, which is the right way to go about things imo.