Importing Custom TypeScript tslint rules into Sonarqube

I’ll be the first to say I am not a fan of sonarqube, but is the only tool out there that can do the job we need. Getting TypeScript working with it was royal butt hurt, but we got there in the end so I wanted to share our journey.

The best way we found to work with it was to store our rules in our tslint config in source control with our own settings and use it as, this is good because it’ll help keep the sonarqube server rules in sync with the developers.

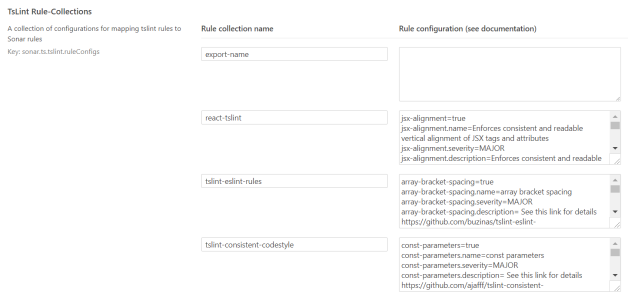
The problem we run into is that the rules need to exist on the server, so if you for example add the react-tslint rules to your project they also need to be defined in the sonarqube server here

/admin/settings?category=typescript

ReactTslintSonarqubeCustomRulesImport

Once they are there sonar understand the rules, but will not process them, but rather than setting up the processing on the server we decide to use our build.

So what we do is

  1. Import ALL rules to sonar server (once off)
  2. run tslint and export failed rules to file
  3. import failed rules using sonar runner (instead of letting runner do analysis)

The server is aware of ALL rules, but its our tslint output that tells it which ones have failed, so you can disable rules in your tsling config that the server is aware of and it won’t report them.

This then means that the local developer experience and the sonarqube report should be a lot more in sync than having to maintain the server processing, and means it easier to run multiple project on the one server with disparate rule sets.

The hard part here though is the import of rules

For our initial import we did the follow rule sets:

  1. react-tslint
  2. tslint-eslint-rules
  3. tslint-consistent-codestyle
  4. tslint-microsoft-contrib

And I have created some powershell scripts that generates the format that is needed from the rules git repos.

To use this clone each of the above repos, then run its corresponding script to generate the output file, then copy and paste this into the section in the sonarqube admin page (it’s ok, this is a once off step).

[gist https://gist.github.com/dicko2/f41f3a4c7bf8787510f68a97d2b2f2ab /]

you should create one record below for each of the four imports, then paste the output from each powershell script into the boxes on the right, as seen below.

TslintRulesSonarqubeCustomRulesImportAirbnb

Once this is done you need to restart the sonarqube server for the rules to get picked up

WARNING: check for duplicate rule names, there is some (I forgot which ones sorry) and they prevent the sonarqube server from starting and you will need to edit the SQL database to fix it.

Then browse to your rule set and active the rules into it. I recommend just creating a single rule set and put everything in it, like i said you can control the rules from your tslint run, and just add all rules to all projects on the sonarqube server side.

SonarqubeTslintActivateMoreRulesTypeScript

After this run your sonarqube analysis build (see here if you haven’t built it yet https://beerandserversdontmix.com/2018/02/03/sonarqube-with-a-multilanguage-project-typescript-and-dotnet/ ) and you are away.


Sonarqube with a MultiLanguage Project, TypeScript and dotnet

Sonarqube is a cool tool, but getting multiple languages to work with it can be hard, especially because each language has its own plugin maintained by different people most of the time, so the implementations are different, so for each language you need to learn a new sonar plugin.

In our example we have a frontend project using React/Typescript and dotnet for the backend.

For C# we use the standard ootb rules from microsoft, plus some of our own custom rules.

For typescript we follow a lot of recommendations from AirBnB but have some of our own tweaks to it.

In the example I am using an end to end build in series, but in reality we use build chains to speed things up so our actual solution is quite more complex than this.

So the build steps look something like this

  1. dotnet restore
  2. Dotnet test, bootstrapped with dotcover
  3. Yarn install
  4. tslint
  5. yarn test
  6. Sonarqube runner

Note: In this setup we do not get the Build Test stats in Teamcity though, so we cannot block builds for test coverage metrics.

So lets cover the dotnet side first, I mentioned our custom rules, I’ll do a separate blog post about getting them into sonar and just cover the build setup in this post.

with the dotnet restore setup is pretty simple, we do use a custom nuget.config file for our internal nuget server, i would recommend always using a custom nuget config file, your IDEs will pick this up and use its settings.


dotnet restore --configfile=%teamcity.build.workingDir%\nuget.config MyCompany.MyProject.sln

The dotnet test step is a little tricky, we need to boot strap it with dotcover.exe, using the analyse command and output HTML format that sonar will consume (yes, sonar wants the HTML format).


%teamcity.tool.JetBrains.dotCover.CommandLineTools.DEFAULT%\dotcover.exe analyse /TargetExecutable="C:\Program Files\dotnet\dotnet.exe" /TargetArguments="test MyCompany.MyProject.sln" /AttributeFilters="+:MyCompany.MyProject.*" /Output="dotCover.htm" /ReportType="HTML" /TargetWorkingDir=.

echo "this is working"

Lastly sometimes the error code on failing tests is non zero, this causes the build to fail, so by putting the second echo line here it mitigates this.

Typescript We have 3 steps.

yarn install, which just call that exact command

Out tslint step is a command line step below, again we need to use a second echo step because when there is linting errors it returns a non zero exit code and we need to process to still continue.


node ".\node_modules\tslint\bin\tslint" -o issues.json -p "tsconfig.json" -t json -c "tslint.json" -e **/*.spec.tsx -e **/*.spec.ts
echo "this is working"

This will generate an lcov report, now i need to put a disclaimer here, lcov has a problem where it only reports coverage on the files that where executed during the test, so if you have code that is never touched by tests they will not appear on your lcov report, sonarqube will give you the correct numbers. So if you get to the end and find that sonar is reporting numbers a lot lower than what you thought you had this is probably why.

Our test step just run yarn test, but here is the fill command in the package json for reference.

"scripts": {
"test": "jest –silent –coverage"
}

Now we have 3 artifacts, two coverage reports and a tslint report.

The final step takes these, runs an analysis on our C# code, then uploads everything

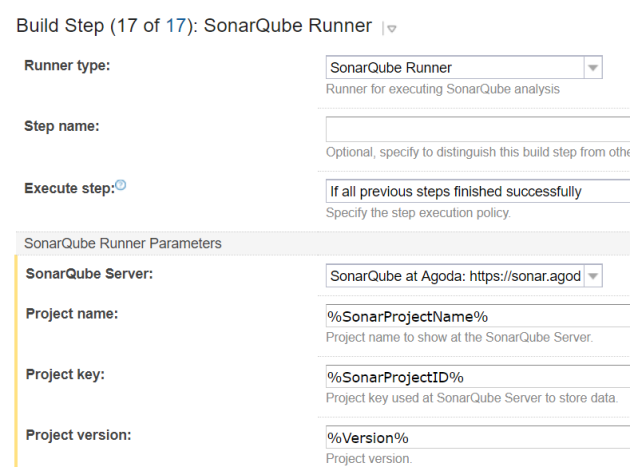
We use the sonarqube runner plugin from sonarsource

SonarqubeRunnerTeamCityTypeScriptDotnet

The important thing here is the additional Parameters that are below

-Dsonar.cs.dotcover.reportsPaths=dotCover.htm
-Dsonar.exclusions=**/node_modules/**,**/dev/**,**/*.js,**/*.vb,**/*.css,**/*.scss,**/*.spec.tsx,**/*.spec.ts
-Dsonar.ts.coverage.lcovReportPath=coverage/lcov.info
-Dsonar.ts.excludetypedefinitionfiles=true
-Dsonar.ts.tslint.outputPath=issues.json
-Dsonar.verbose=true

You can see our 3 artifacts that we pass is, we also disable the typescript analysis and rely on our analysis from tslint. The reason for this is it allows us to control the analysis from the IDE, and keep the analysis that is done on the IDE easily in sync with the Sonarqube server.

Also if you are using custom tslint rules that aren’t in the sonarqube default list you will need to import them, I will do another blog post about how we did this in bulk for the 3-4 rule sets we use.

Sonarqube without a language parameter will auto detect the languages, so we exclude files like scss to prevent it from processing those rules.

This isn’t needed for C# though because we use the nuget packages, i will do another blog post about sharing rules around.

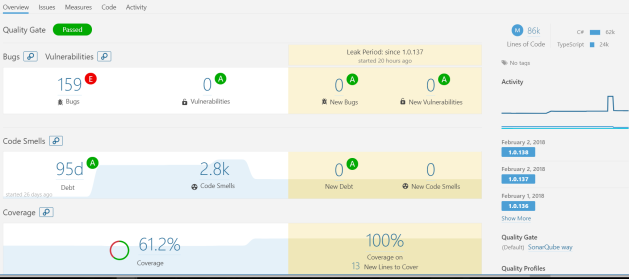
And that’s it, you processing should work and turn out something like the below. You can see in the top right both C# and Typescript lines of code are reported, so this reports Bugs, code smells, coverage, etc is the combined values of both languages in the project.

SonarqubeCodeCoverageStaticAnalysisMultiLanguage

Happy coding!

Swagger WebAPI JSON Object formatting standards between C#, TypeScript and Others

When designing objects in C# you use pascal casing for your properties, but in other languages you don’t, and example (other than java) is TypeScript here’s an article from Microsoft about it.

And that’s cool, a lot of the languages have different standards and depending on which one you are in, you write a little different.

The problem is when you try to work on a standard that defines cross platform communication that is case sensitive, an example being Swagger using REST and JSON.

So the issue we had today was a WebAPI project was generating objects like this:


{
"ObjectId": 203
"ObjectName" : "My Object Name"
}

When swaggerated the object comes out correctly with the correct pascal casing, however when using swagger codegen the object is converted to camel case (TypeScript Below)


export interface MyObject {
 objectId: number;
 objectName: string;
}

The final output is a generated client library that can’t read any objects from the API because JavaScript is case sensitive.

After some investigation we found that when the swagger outputs camel casing the C# client generators (Autorest and Swagger codegen) will output C# code that is in camel casing but with properties to do the translating from camel to pascal, like the below example


/// <summary>
/// Gets or Sets TimeZoneName
/// </summary>
[JsonProperty(PropertyName = "timeZoneName")]
public string TimeZoneName { get; set; }

So to avoid pushing shit up hill we decided to roll down it. I found this excellent article on creating a filter for WebAPI to convert all your pascal cased objects to camel case on the fly

So we found that the best practice is:

  • Write Web API C# in Pascal casing
  • Covert using an action filter from pascal to camel case Json objects
  • Creating the client with TyepScript (or other camel language) default option will then work
  • Creating the C# client will add the JsonProperty to translate from camel to pascal and resulting C# client will be pascal cased

I raised a GitHub Issue here with a link into the source code that I found in swagger codegen, however later realized that changing the way we do things will mitigate long term pain.

AutoRest, Swagger-codegen and Swagger

One of the best things about swagger is being able to generate a client. For me swagger is for REST what WSDL was for SOAP, one of my big dislikes about REST from the start was it was hard to build clients because the standard was so lose, and most services if you got one letter’s casing wrong in a large object it would give you a generic 400 response with no clue as to what the actual problem might be.

Enter Swagger-codegen, Java based command line app for generating proxy clients based on the swagger standard. Awesomesuace! However I’m a .NET developer and I try to avoid adding new dependencies into my development environment (Like J2SE), that’s ok though, they have a REST API you can use to generate the clients as well.

In working on this though I found that MS is also working on their own version of codegen, called AutoRest. AutoRest only support 3 output formats at the moment though, Ruby, Node.js (TypeScript) and C#, But looking at the output from both and comparing them, I am much happier with the AutoRest outputted code, its a lot cleaner.

So in our case we have 3 client requirements C#, Client Side javascript, and Client Side Typescript.

Now either way you go with this, one requirement is you need to be able to “run” your WebAPI service on a web server to generate the json swagger file that will be used in the client code generation. So you could add it into a CI pipeline with your Web API but you would need to do build steps like

  1. Build WebAPI project
  2. Deploy Web API project to Dev server
  3. Download json file from Dev Server
  4. Build client

Or you could make a separate build that you run, I’ve tried both ways and it works fine.

So we decided to use AutoRest for the C# client. This was pretty straight forward, the autorest exe if available in a nuget package. So for our WebAPI project we simply added this, which made it available and build time. Then it was simply a matter of adding a PowerShell step into TeamCity for the client library creation. AutoRest will output a bunch of C# cs file that you will need to compile, which is simply a mater of using the csc.exe, after this I copy over a nupsec file that i have pre-baked for the client library.
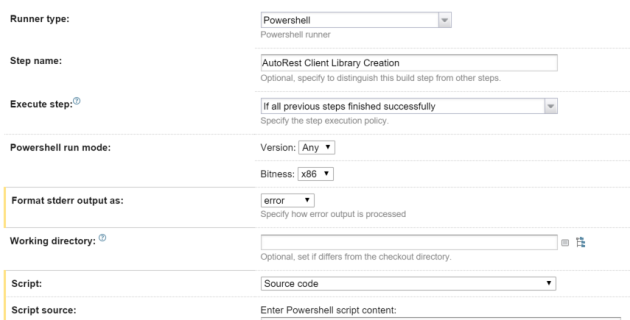
PowerShellAutoRestStepTeamCity


.\Packages\autorest.0.13.0\tools\AutoRest.exe -OutputDirectory GeneratedCSharp -Namespace MyWebAPI -Input http://MyWebAPI.net/swagger/docs/v1 -AddCredentials
& "C:\Program Files (x86)\MSBuild\14.0\bin\csc.exe" /out:GeneratedCSharp\MyWebAPI.Client.dll /reference:Packages\Newtonsoft.Json.6.0.4\lib\net45\Newtonsoft.Json.dll /reference:Packages\Microsoft.Rest.ClientRuntime.1.8.2\lib\net45\Microsoft.Rest.ClientRuntime.dll /recurse:GeneratedCSharp\*.cs /reference:System.Net.Http.dll /target:library
xcopy MyWebAPI\ClientNuspecs\CSharp\MyWebAPI.Client.nuspec GeneratedCSharp

You will note form the above command lines for csc that I have had to add in some references to get it to compile, these need to go into your nuspec file as well, so people installing your client package will have the correct dependencies. Snip from my nuspec file below:


<frameworkAssemblies>
<frameworkAssembly assemblyName="System.Net.Http" targetFramework="net45" />
</frameworkAssemblies>
<dependencies>
<dependency id="Microsoft.Rest.ClientRuntime" version="1.8.2" />
<dependency id="Newtonsoft.Json" version="6.0.8" />
</dependencies>

After this just add a Nuget Publish step and you can start pushing your library to nuget.org, or in out case just our private internal server.

For authentication we use Basic Auth over SSL, so adding the “-AddCredentials” command line parameter is needed to generate the extra methods and properties for us, you may or may not need this.

Below is an example console app where I have installed the nuget package that autorest created, this uses basic auth which you my not need.

namespace ConsoleApplication1
{
class Program
{
static void Main(string[] args)
{
var svc = new MyClient();
svc.BaseUri = new Uri("https://MyWebAPILive.com");
svc.Credentials= new BasicAuthenticationCredentials{UserName = "MyUser",Password = "MyPassword!"};
Console.WriteLine(svc.HelloWorld());
Console.ReadLine();
}
}
}

Next we have swagger codegen for our Client libraries. As I said before I don’t want to add J2SE into our build environment to avoid complexity, so we are using the API. I’ve built a gulp job to do this.

Why gulp? the javascript client output from codegen is pretty rubbish, so instead of using this I’m getting the typescript library and compile it, then minify, i find this easier to do in gulp.

The Swagger UI for the Swagger Codegen api is here. When you call the POST /gen/clients method you pass in your json file, after this it returns a URL back that you can use to then download a zip file with the client package. Below is my gulpfile

var gulp = require('gulp');
var fs = require('fs');
var request = require('request');
var concat = require('gulp-concat');
var unzip = require('gulp-unzip');
var ts = require('gulp-typescript');
var tsd = require('gulp-tsd');
var tempFolder = 'temp';

gulp.task('default', ['ProcessJSONFile'], function () {
// doco https://generator.swagger.io/#/
});

gulp.task('ProcessJSONFile', function (callback) {
return request('http://MyWebAPI.net/swagger/docs/v1',
function (error, response, body) {
if (error != null) {
console.log(error);
return;
}
ProcessJSONFileSwagOnline(body);
});
});

function ProcessJSONFileSwagOnline(bodyData) {
bodyData = "{\"spec\":" + bodyData + "}"; // Swagger code Gen web API requires the output be wrapped in another object
return request({
method: 'POST',
uri: 'http://generator.swagger.io/api/gen/clients/typescript-angular',
body: bodyData,
headers: {
"content-type": "application/json"
}
},
function (error, response, body) {
if (error) {
console.log(error);
return console.error('upload failed:', error);
}
var responseData = JSON.parse(body);
var Url = responseData.link;
console.log(Url);
downloadPackage(Url);
});
};

function downloadPackage(Url) {
return request(Url,
function(error, response, body) {
console.log(error);
}).pipe(fs.createWriteStream('client.zip'), setTimeout(exctractPackage,2000));
};

function exctractPackage() {
gulp.src("client.zip")
.pipe(unzip())
.pipe(gulp.dest(tempFolder));
setTimeout(moveFiles,2000);
};

function moveFiles() {
return gulp.src(tempFolder + '/typescript-angular-client/API/Client/*.ts')
.pipe(gulp.dest('generatedTS/'));
};

Now I am no expert at Node.js I’ll be the first to admit, so I’ve added a few work arounds using setTimeout in my script as I could get the async functions to work correctly, if anyone wants to correct me on how these should be done properly please do 🙂

At the end of this you will end up with the type script files in a folder that you can then process into a package. We are still working on a push to GitHub for this so that we can compile a bower package for us, I will make another blog post about this.

In the typescript output there will always be a api.d.ts file that you can reference into your TypeScript project to expose the client. I’ll do another post about how we setup or Dev Environment for compile the TypeScript from bower packages.

for our Javascript library we just need to add one more step.


function compileTypeScriptClientLib() {
var sourceFiles = [tempFolder + '/**/*.ts'];

gulp.src(sourceFiles)
.pipe(ts({
out: 'clientProxy.js'
}))
.pipe(gulp.dest('outputtedJS/'));
};

This will compile us our JS script library, we can then also minify it in gulp as well, before packaging, again bower is the technology for distributing client packages, so after this we push to GitHub, but i’ll do another blog post about that.

The output you get from TypeScript in CodeGen is angularJS, which is fine as “most” of our apps use angular already, however a couple of our legacy ones don’t, so the client proxy object that is created needs a bit of work to inject it’s dependencies.

Below is an example of a module in javascript that I use to wrap the AngularJS service and return it as a javascipt object with the Angular Dependencies injected:


var apiClient = (function (global) {
var ClientProxyMod= angular.module("ClientProxyMod", []);
ClientProxyMod.value("basePath", "http://MyWebAPILive.com/"); // normally I'd have a settings.js file where I would store this
ClientProxyMod.service("MyWebAPIController1", ['$http', '$httpParamSerializer', 'basePath', API.Client.MyWebAPIController1]);
var prx = angular.injector(['ng', 'ClientProxyMod']).get('MyWebAPIController1');
return {
proxy: prx
}
}());

You would need to do the above once for each controller you have in your WebAPI project, the codegen outputs one service for each controller.

One of the dependencies of the Service that is created by CodeGen is the “basePath” this is the URL to the live service, so i pass this in as a value, you will need to add this value to your Angular JS module when using in an Angular JS app as well.

Using basic auth in AngularJS is pretty straight forward because you can set it on the $http object which is exposed as a property on the service.


apiClient.proxy.$http.defaults.headers.common['Authorization'] = "Basic " + btoa(username + ":" + password);

Then you can simply call your methods from this apiClient.proxy object.


TypeScript Project AppSettings

Ok so there’s a few nice things that MS have done with typescript, but Dev time vs build time vs deploy time they don’t all work the same, so there’s a few things we’ve done to make the F5 experience nice while making sure the build and deployed results are the same.

In the below examples we are using

  • Visual Studio 2015
  • Team City
  • Octopus Deploy

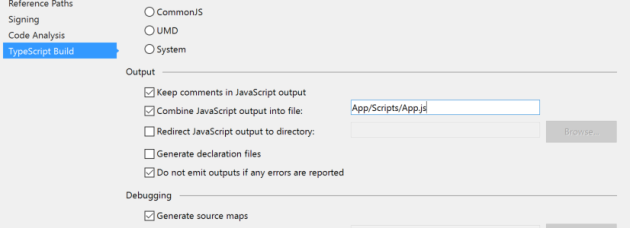
Firstly TypeScript in Visual Studio has this nice feature to wrap up your typescript into a single js file while your coding. It’ll save to this file as you are saving your TS files, so its nice for making code changes on the fly while debugging, and you get a single file output.

TypeScriptCombine

Also this will build when TeamCity runs msbuild as well. But don’t check this file in, its compile ts output, it should be treated like binary output from a C# project.

And you can further minify and compact this using npm (see this post for details).

This isn’t prefect though, because we shovel our static content to a separate CDN that is spared between environments (Folder per version), and we have environment specific JavaScript variables that need to be set, this can’t be done in a TypeScript file as they all compile into a single file. I could use npm to generate the TypeScript into 2 files but this conflicts too much with the developers local setup in using the above feature from my tests.

So we pulled it into a js file that is separate form the type script, this obviously though causes the type script to break as the object doesn’t exist. So we added a declaration file for it like below:

declare var AppSetting: {
url: string;
baseCredential: string;
ApiKey: string;
}

Then drop the actual object in a JavaScript file with the tokens ready for octopus, with a simple if statement to drop in the Developers local settings when running locally.


var AppSetting;
(function (AppSetting) {
if (window.location.hostname == "localhost") {
AppSetting.url= "http://localhost:9129/";
AppSetting.baseCredential= "XXXVVVWWW";
AppSetting.ApiKey= "82390189wuiuu";
} else {
AppSetting.url= "#{url}";
AppSetting.baseCredential= "#{baseCredential}";
AppSetting.ApiKey= "#{ApiKey}";
}
})(AppSetting || (AppSetting = {}));

This does mean we need a extra http request to pull down the appSetting js file for our environment, but it means we can maintain our single CDN for static content/code like we have traditionally done.