Exception Logging and Tracking with Application Insights 4.2

After finally getting the latest version of App Insights Extension installed into Visual Studio, its been a breath of fresh air to use.

Just a note, to get it installed, I had to go to to installed programs, hit modify on VS2015, make sure everything else was updated. Then run the installer 3 times, it failed twice, 3rd time worked.

Now its installed I get a new option under my config file in each of my projects called “search”.

ApplicationInsightsVisualStudioExtension.PNG

This will open the Search window inside a tab in visual studio to allow me to search my application data. The first time you hit it you will need to login and link the project to the correct store though, after that it remembers.

ApplicationInsightsSearchExceptionsVisualStudio

From here you can filter for and find exceptions in your applications and view a whole host of information about them. Including information about the server, client, etc. But my favorite feature is the small blue link at the bottom.

ExceptionInformationApplicaitonInsights

Click on this will take you to the faulting function, it doesn’t take you to the faulting line though (which i think it should) but you can mouse over it to see the line.

LinkToCodeWhereExceptionWasThrown

One of the other nice features, which was also in the web portal. is the +/- 5 minutes search.

5MinuteSearchEitherSideOfException

You can use this to run a search for all telemetry within 5 minutes either side of the exception. In the web portal there is also an option of “all telemetry of this session”, which is missing from the VS interface, I hope they will introduce this soon as well.

But the big advantage to this is if you have setup up App Insights for all of your tracking you will be able to see all of the following for that session or period:

  • Other Exceptions
  • Page Views
  • Debug logging (Trace)
  • Custom Events (If you are tracking thinks like feature usage in JavaScript this is very handy)
  • Raw Requests to the web server
  • Dependencies (SQL calls)

Lets take a look at some of the detail we get on the above for my +/- 5 Minute view

Below is an SQL dependency, this is logging all my queries. So I can see whats called, when, the time the query took to run, from which server, etc. This isn’t any extra code I had to write, App Insights will track all SQL queries that run from your application out of the box, once setup.

AppInsightsSQLDependancy

And dependencies won’t just be SQL, they will also be SOAP and REST requests to external web services.

Http Request monitoring the detail is pretty basic but useful.

HttpRequestMonitoring

And Page views you get some pretty basic info also. Not as good as some systems i have seen, but defiantly enough to help out with diagnosing exceptions.

PageViewAppInsights

I’ve been using this for a few days now and find it so easy to just open my solution in the morning and do a quick check for exceptions, narrow them down and fix them. Still needs another version or two before it has all the same features as the web interface, but defiantly worth a try if you have App Insights setup.


Swagger WebAPI JSON Object formatting standards between C#, TypeScript and Others

When designing objects in C# you use pascal casing for your properties, but in other languages you don’t, and example (other than java) is TypeScript here’s an article from Microsoft about it.

And that’s cool, a lot of the languages have different standards and depending on which one you are in, you write a little different.

The problem is when you try to work on a standard that defines cross platform communication that is case sensitive, an example being Swagger using REST and JSON.

So the issue we had today was a WebAPI project was generating objects like this:


{
"ObjectId": 203
"ObjectName" : "My Object Name"
}

When swaggerated the object comes out correctly with the correct pascal casing, however when using swagger codegen the object is converted to camel case (TypeScript Below)


export interface MyObject {
 objectId: number;
 objectName: string;
}

The final output is a generated client library that can’t read any objects from the API because JavaScript is case sensitive.

After some investigation we found that when the swagger outputs camel casing the C# client generators (Autorest and Swagger codegen) will output C# code that is in camel casing but with properties to do the translating from camel to pascal, like the below example


/// <summary>
/// Gets or Sets TimeZoneName
/// </summary>
[JsonProperty(PropertyName = "timeZoneName")]
public string TimeZoneName { get; set; }

So to avoid pushing shit up hill we decided to roll down it. I found this excellent article on creating a filter for WebAPI to convert all your pascal cased objects to camel case on the fly

So we found that the best practice is:

  • Write Web API C# in Pascal casing
  • Covert using an action filter from pascal to camel case Json objects
  • Creating the client with TyepScript (or other camel language) default option will then work
  • Creating the C# client will add the JsonProperty to translate from camel to pascal and resulting C# client will be pascal cased

I raised a GitHub Issue here with a link into the source code that I found in swagger codegen, however later realized that changing the way we do things will mitigate long term pain.

XML and JSON (De)Serialization Tools

I’ve been working with a lot of external systems lately that have their own objects that they serialize into either JSON or XML, and have found some good to tools to rebuild those objects into C# classes that i can add to my apps.

For XML I’ve found this one (http://xmltocsharp.azurewebsites.net/)

Some Example XML from one of the Apps I’ve been working with (This was a sample on their website)


<reply>
    <contents>...</contents>
    <attachment filename="..." md5="...">
      <!-- base-64 encoded file contents -->
    </attachment>
  </reply>

The tools nicely converts to the below C#


[XmlRoot(ElementName="attachment")]
public class Attachment {
[XmlAttribute(AttributeName="filename")]
public string Filename { get; set; }
[XmlAttribute(AttributeName="md5")]
public string Md5 { get; set; }
}

[XmlRoot(ElementName="reply")]
public class Reply {
[XmlElement(ElementName="contents")]
public string Contents { get; set; }
[XmlElement(ElementName="attachment")]
public Attachment Attachment { get; set; }
}

Then i can use the following code to deserialise their Response Stream from the HTTP response


Reply reply=new Reply ();
var resp = CallA MethodThatReturnsaStreamResposne();
using (var sr = new StreamReader(resp))
{
var xs = new XmlSerializer(reply.GetType());
reply= (Model.Tickets)(xs.Deserialize(sr));
}

Pretty similar with JSON too, using this site (http://json2csharp.com/)

However they don’t support invalid names, so i am going to use one int his example and how to work around it.

{".Name":"Jon Smith"}
public class RootObject
{
    public string __invalid_name__.Name { get; set; }
}

JSON properties support dashes and periods, which are not supported in C#, so in C# there is support for a attribute “jsonproperty” that you can use like the below to fix the issue.

 
public class RootObject
{
    [JsonProperty(".Name")]
    public string Name { get; set; }
}

Then to deserialize I use the Newtonsoft JSON libraries example below

var del = message.GetBody<string>();
var myObject = JsonConvert.DeserializeObject<RootObject>(del); 

Obviously thought you would not leave it named as “RootObject” though 🙂

In the example above i was reading a JSON object from a Azure Service Bus Queue.

Lastly, thought i would add in the class i use for going back to XML. In this case i was working on today I was going to a PHP based system Kayako and it has some strange requirements.

I created a class to inherit my XML objects from so add an extension method.

     public class XmlDataType
    {
        public string ToXmlString()
        {
            StringBuilder sb = new StringBuilder();
            string retval = null;
            
            using (XmlWriter writer = XmlWriter.Create(sb, new XmlWriterSettings() {Encoding = Encoding.UTF8}))//{OmitXmlDeclaration = true}
            {
                var ns = new XmlSerializerNamespaces();
                
                ns.Add(&quot;&quot;, &quot;&quot;);
                new XmlSerializer(this.GetType(),new XmlAttributeOverrides() { }).Serialize(writer, this,ns);
                retval = sb.ToString();
            }
            return retval.Replace(&quot;utf-16&quot;,&quot;UTF-8&quot;);
        }
    }

Kayako only accepts UTF8 not UTF16, adn you need to remove the xmlns properties, which i do with the Namespace declaration above.

The way I’ve changed UTF16 to 8 is a bit dodgy but it works for Kayako.

Now i can just call MyObject.ToXmlString() and get a string for the XML data that i can pass into a HTTP Request.

Noting that some of the Kayako methods don’t like the xml tag at the start, so if you need to remove this I’ve left in a bit of commented out code that you can use in the XML Writer settings initialization.

Converting Between UTC and TimeZone in SQL CLR

I make a habit of storing in UTC time, and then converting when displaying, or getting input form the user. It makes things a lot easier and more manageable. I have yet to try a large project with the new offsets data type, but worried about how they will handle daylight savings time, which is a constant source of frustration for Australian Developers (Disclaimer: I come from Queensland where our cows don’t like it either).

Most of the time we handle the conversion in the Application or Presentation layer, I don’t like to encourage developers to handle it in the SQL layer because this is the most common place of doing comparisons and means you have more opportunity for Developer error when one side of your comparison is in the wrong Time Zone.

However there are a few cases where it is needed so today I whipped up a project that is backwards compatible to SQL 2008 R2 (the earliest version running in prod systems i work on).

GitHub Link here https://github.com/HostedSolutions/SQLDates

it basically re-advertises the TimeZoneInfo object, wrapped up specific to what I use which is going back and forth from UTC to what ever time zone my users are in.

Most of my projects are either multi-tenanted, or have users in different states in Australia that need to view data in their own timezone.

Going to UTC below (i.e. form user input in a text box).


[Microsoft.SqlServer.Server.SqlFunction]
public static SqlDateTime ConvertToUtc(SqlString dotNetTimeZone, SqlDateTime theDateTime)
{
var localDate = DateTime.SpecifyKind((DateTime)theDateTime, DateTimeKind.Unspecified);

// create TimeZoneInfo by string time zone.
var timeZoneInfo = TimeZoneInfo.FindSystemTimeZoneById(dotNetTimeZone.ToString());

// convert date local to utc date by time zone.
return TimeZoneInfo.ConvertTimeToUtc(localDate, timeZoneInfo);
}

Coming from UTC below (i.e. form data in a database table)

[Microsoft.SqlServer.Server.SqlFunction]
public static SqlDateTime ConvertToLocalTimeZone(SqlString dotNetTimeZone, SqlDateTime theDateTime)
{
// create TimeZoneInfo by string time zone by time zone.
var timeZoneInfo = TimeZoneInfo.FindSystemTimeZoneById(dotNetTimeZone.ToString());

// convert date utc to local date.
return TimeZoneInfo.ConvertTimeFromUtc((DateTime)theDateTime, timeZoneInfo);
}

The DataTools SQL projects these days are great, you just need to add a reference into your C# library from your SQL project, and it’ll compile into the SQL script that generates for deploy, examples are all in the github project.

Just noting that you can’t compile a C# class library for 3.5 in a SQL Data Tools project, you need to create an external C# class library project, because 3.5 reference in the SQL projects have some issue with mscorlib.

SQLDataToolsProjectReference

After adding the reference you also need to also set it to “unsafe”

SetReferenceToCLRProjectUnsafe

Then when you publish the Class with output like the below into your deployment script:

CREATE ASSEMBLY [SQLDatesFunc]
AUTHORIZATION [dbo]
FROM 0x4D5A90000300000004000000FFFF0000B8000000000000004000...
WITH PERMISSION_SET = UNSAFE;

I’ve also included a post deploy script in this example code with the other settings you need to get you database going with CLR functions

sp_configure 'clr enabled', 1
GO
RECONFIGURE
GO
ALTER DATABASE [$(DatabaseName)] SET TRUSTWORTHY ON;
GO


Test Manager Workflow, Manual to Automation

We’ve been using a lot of Test Manager Lately and I am really happy with the work flow that is built into TFS with this product.

We have full time testers who don’t have a lot of experience with code, so you can’t give them tools like the CUIT recorder in visual studio and expect them to run with it. But they are the best people to use tools like this because they understand testing more, and also in my experience testers tend to be more thorough than developers.

The other thing I like about the workflow is that its “Documentation First”, so your documentation is inherently linked into the Test platform.

Microsoft Test Manager’s recorder tools is a good cut down version of CUIT that makes things easier for the testers to record manual tests but not get caught up in code.

That being said, it is a pain in the ass to get running, we have a complicated site with a lot of composite controls, so the DOM was a bit ugly, and this made it a painful exercise to get any recorder going (We also tried Teleirk Test Studio and Selenium with similar issues as well, but Telerik Test Studio was probably the best out of them)

The basic workflow in Test Manager Stars with the Test Case work Item, from a test Case you outline your test steps

TestManagerCreateTestCase

The important thing here is the use of parameters, you can see in the above example that I am using @URL, @User and @Pass.

In the test case you can input n number of iterations of these, then when creating the test recorder it will play back one iteration per set, this allows testers to go nuts with different sets and edge cases (e.g. 200 Ws for a name, all the special characters in the ASIC set for someone’s last name, Asian character sets, and so on).

Once the documentation is done the test recorder is used (with IE, doesn’t work in other browsers) to save a recorded case. Which can then be played back while someone is watching, which is the first level of automation, i think this is an important first step, because in your development flow if you are working on a new features (requiring a new test case) then you want a set of eyes looking at it first, you don’t want to straight away go to full automation.

It’s important to note though that the test recorder cannot be used to “Assert” values like CUIT, validation of success is done by the Tester looking at the screen and deciding.

When you have past all your newly created test cases and your new features are working, Product Owner and stakeholders are all happy with the UI, this is the point you want to go to full Automation with your UI tests.

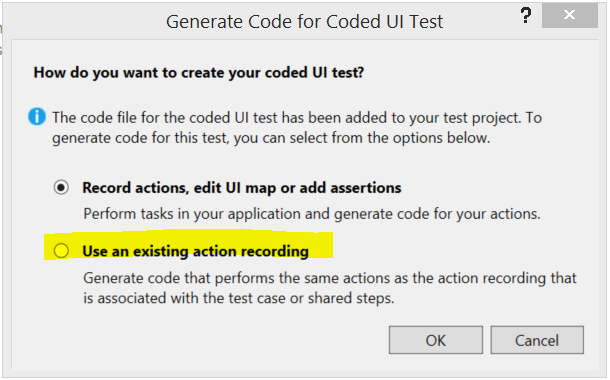
When creating a CodedUI test one of the options is to “Use an existing Recording”

ImportTestFromRecording

After selecting this you can search through your work items for the test case and Visual Studio will pull out the recording and generate your CodedUI test starting with what your testers have created.

SearchWorkItemsForTestRecording

That will go through and generate something like the below code.


[DataSource("Microsoft.VisualStudio.TestTools.DataSource.TestCase", "https://MyTFSServer/tfs/defaultcollection;MyProject", "13934", DataAccessMethod.Sequential)]
[TestMethod]
public void CodedUITestMethod1()
{
// To generate code for this test, select "Generate Code for Coded UI Test" from the shortcut menu and select one of the menu items.
this.UIMap.GoToURLParams.UIboxLoadBalanceWindowUrl = TestContext.DataRow["URL"].ToString();
this.UIMap.GoToURL();
this.UIMap.EnterUserandPassParams.UITxtEmailEditText = TestContext.DataRow["User"].ToString();
this.UIMap.EnterUserandPassParams.UITxtPasswordEditPassword = Playback.EncryptText(TestContext.DataRow["Pass"].ToString());
this.UIMap.EnterUserandPass();
this.UIMap.ClickLoginbutton();
}

The great thing about this is that we can see the attribute for the datasource, it refers to the TFS server and even the work item ID. so this is where the CodedUI test is going to get its data.

So your testers can maintain the data in their Test Plans in TFS and the testing automation will look back into these TFS work items to get their data each time they run.

Now that you are in the CUIT environment you can start to use the CUIT recorder to add Asserts to your tests and validate data. In the above example we might do something like Assert that username text displayed on the page after login is the same as the value we logged in as.

Now we have a working Coded UI test we can add it to a build.

I generally don’t do CodeUI Tests in our standard builds, I don’t know anyone that does, we use n-Tier environment, so in order to run a single app you would need to start up a couple service layers and a database behind it. So i find it better to create a separate solution and builds for the coded UI test and schedule them to run after a full deploy of all layers to test environment overnight.

As in the example above, we put the initial “Open this URL in the Browser” step’s URL as a parameter, so if we want to change the target to another environment, or point it at local host, this is easy, and i defiantly recommend doing this.

So putting it all together we have the below work flow:

WorkflowTestManager

Now the thing I like about this is they all feed from the same datasource, which is a Documented Test Plan from your testers, who can then updated a single datasource that’s in a format they not only understand but have control over.

Take the example you are implementing Asian Language support. In the above example you could simple add a new parameter set to the test case that has a Chinese character username in it, which could be done by a tester, then if it wasn’t support the build would start failing.

Lastly I mentioned before IE only, that’s for recording, there is some plugins to allow playback in different browser that I will be checking out soon and make some additional posts about.

This process also works well into your weekly sprint cycles, which I will go into in another post.

Stopping Private AppSettings Getting into Public Repos

Generally we check-in just development AppSettings that refer to things like “localhost:3456”, etc. but we have some instances where we can’t run the service on our locals.

Why? one good example is the work we do against our on-premise TFS server, while i have considered an F5 experience that “runs up” a TFS server on a developers local I just don’t think we (or most people) have the budget to spend on a workstation that will handle this. Also add the other services we do integration against as well (TeamCity, Octopus, etc.)

We use a separate project in TFS, octopus etc and sometimes separate servers, for our development work so we aren’t interfering with live systems, but the credentials and URL aren’t something i want appearing in GitHub public Repos.

So how we work around this is a very old setting

<configuration>
<appSettings file="../../../MyRepoName.config">
<add key="TeamCityPassword" value="XXXXX" />
<add key="TeamCityUserName" value="ABCDE" />

The above usage of the file property points to a location outside the repo, i have setup a config file like this for each public repo that i use.

The good thing about this as well is if that file is not present (i.e. when its deployed to production) then it simply ignores it.You could also remove it with the Web.Release.config transform as well to be clean about it, example below.


<appSettings xdt:Transform="RemoveAttributes(file)"/>