Build System integration with Environment Variables

Different CI systems expose a variety of an array of information in environment variables for you to access, for example commit hash, branch, etc which is handy if you are writing CI tooling. Some of them even seek to standardize these conventions.

This post is primarily about collating that info into a single source for lookup. Ideally if you are writing tooling that you want a lot of people use you should support multiple CI systems to increase adoption.

As we look at each the first thing we need to do is tell which system is running, each CI platform has a convention to allow you to do this that we’ll talk about first

Below is a table of each Major build system and example bash of how to detect that the process is running in them, as a well as link to documentation on Env Vars that the system exposes.

Jenkins“$JENKINS_URL” != “”
Travis“$CI” = “true”
“$TRAVIS” = “true”
AWS Codebuild“$CODEBUILD_CI” = “true”
Teamcity“$TEAMCITY_VERSION” != “”
Circle CI“$CI” = “true”
“$CIRCLECI” = “true”
Semaphore CI“$CI” = “true”
“$SEMAPHORE” = “true”
Drone CI“$CI” = “drone”
“$DRONE” = “true”
Heroku“$CI” = “true”
“$HEROKU_TEST_RUN_BRANCH” != “”
Appveyor CI“$CI” = “true” || “$CI” = “True”
“$APPVEYOR” = “true” || “$APPVEYOR” = “True”
Gitlab CI“$GITLAB_CI” != “”
Github Actions“$GITHUB_ACTIONS” != “”
Azure Pipelines“$SYSTEM_TEAMFOUNDATIONSERVERURI” != “”
Bitbucket“$CI” = “true”
“$BITBUCKET_BUILD_NUMBER” != “”

Below is 4 commonly used Parameters as an example, there are much more available, but as you can see form this list there is a lot of commonality.

Build SystembranchcommitPR #Build ID
JenkinsghprbSourceBranch
GIT_BRANCH
BRANCH_NAME
ghprbActualCommit
GIT_COMMIT
ghprbPullId
CHANGE_ID
BUILD_NUMBER
Travis TRAVIS_BRANCHTRAVIS_PULL_REQUEST_SHATRAVIS_PULL_REQUESTTRAVIS_JOB_NUMBER
AWS CodebuildCODEBUILD_WEBHOOK_HEAD_REFCODEBUILD_RESOLVED_SOURCE_VERSIONCODEBUILD_SOURCE_VERSIONCODEBUILD_BUILD_ID
Teamcity BUILD_VCS_NUMBERTEAMCITY_BUILD_ID
Circle CI CIRCLE_BRANCHCIRCLE_SHA1CIRCLE_PULL_REQUESTCIRCLE_BUILD_NUM
Semaphore CI SEMAPHORE_GIT_BRANCHREVISIONPULL_REQUEST_NUMBERSEMAPHORE_WORKFLOW_NUMBER
Drone CI DRONE_BRANCHDRONE_PULL_REQUESTDRONE_BUILD_NUMBER
Heroku HEROKU_TEST_RUN_BRANCHHEROKU_TEST_RUN_COMMIT_VERSIONHEROKU_TEST_RUN_ID
Appveyor CI APPVEYOR_REPO_BRANCHAPPVEYOR_REPO_COMMITAPPVEYOR_PULL_REQUEST_NUMBERAPPVEYOR_JOB_ID
Gitlab CI CI_BUILD_REF_NAME
CI_COMMIT_REF_NAME
CI_BUILD_REF
CI_COMMIT_SHA
CI_BUILD_ID
CI_JOB_ID
Github Actions GITHUB_REFGITHUB_SHAcan get from RefGITHUB_RUN_ID
Azure Pipelines BUILD_SOURCEBRANCHBUILD_SOURCEVERSIONSYSTEM_PULLREQUEST_PULLREQUESTID
SYSTEM_PULLREQUEST_PULLREQUESTNUMBER
BUILD_BUILDID
Bitbucket BITBUCKET_BRANCHBITBUCKET_COMMITBITBUCKET_PR_IDBITBUCKET_BUILD_NUMBER

For Teamcity a common work around to it’s lack of env vars is to place a root level set of parameters that will inherit to every config on the server

example

env.TEAMCITY_BUILD_BRANCH = %teamcity.build.branch%
env.TEAMCITY_BUILD_ID = %teamcity.build.id%
env.TEAMCITY_BUILD_URL = %teamcity.serverUrl%/viewLog.html?buildId=%teamcity.build.id%
env.TEAMCITY_BUILD_COMMIT = %system.build.vcs.number%

GitHub Pull Request Merge Ref and TeamCity CI fail

GitHub has an awesome feature that allows us to build on the potential merge result of a pull request.

This allows us to run unit and UI tests against the result of a merge, so we know with certainty that it works, before we merge the code.

To get this working with TeamCity is a pain in the ass though.

Lets look at a basic workflow with this:

First we will look at two active pull request, and we are about to merge

MasterFeatureBranchGitHubFlow

Pull request 2 advertises the /head (actual branch) and /merge (result “if we merged”)

TeamCity say you should tie your builds to the /merge for CI, this will build the merge result, and I agree.

However lets look at what happens in GitHub when we merge in Feature 1.

MasterFeatureBranchGitHubFlowMergedFeature1

The new code goes into master, which will recalculate the merge result on Pull request 2. TeamCity correctly builds the merge reference and validates that the Pull Request will succeed.

However if we look in GitHub we will see the below

UpdateGitHubBranch

It now blocks you and prompts you to updates your branch.

After you click this, the /head and /merge refs will update, as it adds a commit to your branch and recalculates the merge result again, then you need wait for another build to validate the new commit on your branch.

MergeAndHeadRefOnGitHubBranchUpdate

This now triggers a second build.And when it completes you can merge.

The issues here is we are double building. There is two solutions as I see it,

  1. GitHub should allow you top merge without updating your branch
  2. TeamCity should allow you to trigger from one ref and build on a different one

I was able to implement the second result using a build configuration that calls the TeamCity API to trigger a build. However my preference would be number 1 as this is more automated.

BuildOffDifferentBranchFromTrigger

Inside it looks like this

BuildOffDifferentBranchFromTrigger1

Below is example powershell that is used in the trigger build, we had an issue with the SSL cert (even though it wasn’t self signed) so had to disable the check for it to work.

add-type @"
using System.Net;
using System.Security.Cryptography.X509Certificates;
public class TrustAllCertsPolicy : ICertificatePolicy {
public bool CheckValidationResult(
ServicePoint srvPoint, X509Certificate certificate,
WebRequest request, int certificateProblem) {
return true;
}
}
"@
[System.Net.ServicePointManager]::CertificatePolicy = New-Object TrustAllCertsPolicy

$buildBranch ="%teamcity.build.branch%"
Write-Host $buildBranch
$buildBranch = $buildBranch.Replace("/head","/merge")
$postbody = "<build branchName='$buildBranch'>
<buildType id='%TargetBuildType%'/>
</build>"
Write-Host $postbody
$user = '%TeamCityUser%'
$pass = '%TeamCityPassword%'

$secpasswd = ConvertTo-SecureString $pass -AsPlainText -Force
$credential = New-Object System.Management.Automation.PSCredential($user, $secpasswd)

Invoke-RestMethod https://teamcity/httpAuth/app/rest/buildQueue -Method POST -Body $postbody -Credential $credential -Headers @{"accept"="application/xml";"Content-Type"="application/xml"}

You will see that we replace the branch name head with merge, so we trigger after someone clicks the update branch button only.

Also don’t forget to add a VCS trigger for file changes “+:.”, so that it will only run builds when there are changes.

VCSTriggerRule

We are running with this solution this week and I am going to put a request into GitHub support about option 1.

This is a really big issues for us as we have 30-40 open pull requests on our repo, so double building creates a LOT of traffic.

If anyone has a better solution please leave some comments.


Private Nuget Servers – VS Team Services Package Management

A while back i setup a Klondike server for hosting our internal nuget packages. We use it for both internal libraries and octopus.

Microsoft recently released the Package Management feature for VSTS (Formerly know as VSO), the exciting thing about Package Management is that they have hinted they will include support for npm and bower in future, so you will have a single source for all your package management.

VisualStudioMarketPlacePackageManagement

After Installing in VSTS you will get a new “Package” option in the top bar.

PrivateNugetServerOackageManagerVSTS

From here you can create new feeds. In my case I’ve decide to break up my feeds to one per project, but you could easily create more per project if you had for example separate responsibilities where you wanted to have more granular permissions. You can restrict the Publish and Read rights to the feeds to users OR groups within VSTS so its very easy to manage, unlike my hack around for permissions in my previous post about Klondike.

CreateNewNugetFeed

Now because we use TeamCity I have considered creating the build service their own Account in VSTS as they need credentials, but in this example I’m just using my own account.

You will need to change the “pick your tool” option to nuget 2.x to get your credentials to use in the TeamCity Steps.

OldVersionOfNugetFeed

Then click “Generate nuget Credentials” and grab the username and password out.

GetNugetCredentials

NugetFeedCredentials

Next hop over to your TeamCity Server, and edit/add your build configuration.

It’s important to note that you will require at least TeamCity version 9.1.6 to do this, as there is a fix in here for nuget credentials.

First jump into “Build Features”, and add a set of nuget credetails with the URL of your feed that you got from the VSTS interface.

AddNugetServerFeedCredentialsTeamCity

Then jump over to your Build steps and edit/add your nuget steps. Below is an example of my publish step.

NugetPublishStepTeamCity

The API key I’ve set to “VSTS” as per the instructions in the web interface of VSTS.

And we are publishing.

TeamCityBuildOutputNugetPublishVSTS

You will see the built packages in the VSTS interface when you are done.

NugetPacakgeVSTSWeb

Now if you have an Octopus server like us you will need to add the credentials into it as well into the nuget feeds section.

OctopusAddExternalNugetFeedVSTS

OctopusNugetPackageVSTSFeed

And its that easy.

One of our concerns about the Klondike server we setup was capacity. Because we have more than 12 developers and run CI with auto deployment to development environment, we are generating a large number of packages daily as developers check-in/commit work, so over a period of months and years the server has become quite bloated, though to give it credit i am surprised at how long it took to get bloated.

Some queries are taking upwards of 15-20 seconds at times and we have an issue (which I have not confirmed is related) where packages are randomly “not there” after the build log say they have been successfully published.

I am hoping that the VSTS platform will do us for longer, and it has the added advantage of the granular permissions which we will be taking advantage of as we grow.


Deploying to Telerik Platform from Octopus Server

We have been suing Telerik Platform for a while now, while their platform is great, going from TFVC to Build to Platform for deploy always involved someone building for their local visual studio, which of course carries the risks of:

  1. Manually changing settings from local to dev/test/live and things getting missed
  2. Unchecked-in code going up
  3. Manual Labor

So since they have a CLI we decided to try to automate this process, its a bit wired what we came up with because we build at deployment time, but it works.

I setup a git repo for this one with an example solution using the friends app (https://github.com/HostedSolutions/platform-friends-hybrid)

Summary of what we are going to setup with this process

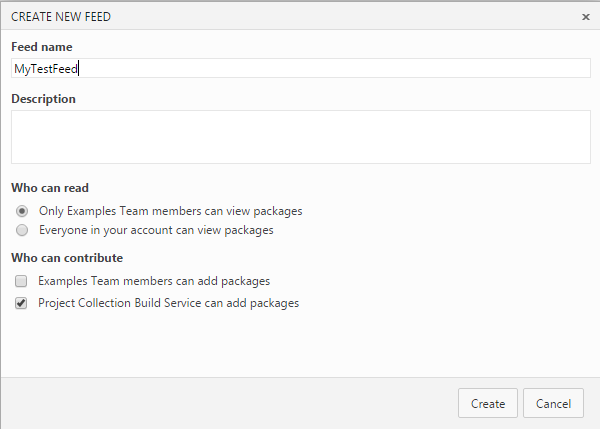
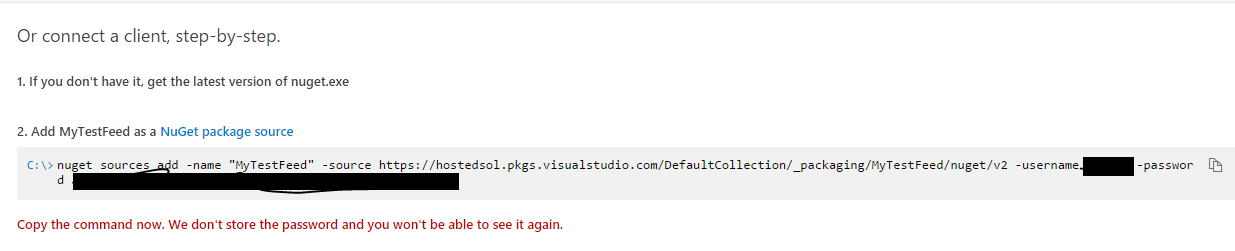
  1. Package the project into a nuget package on the TeamCity Server and stick it into a nuget server
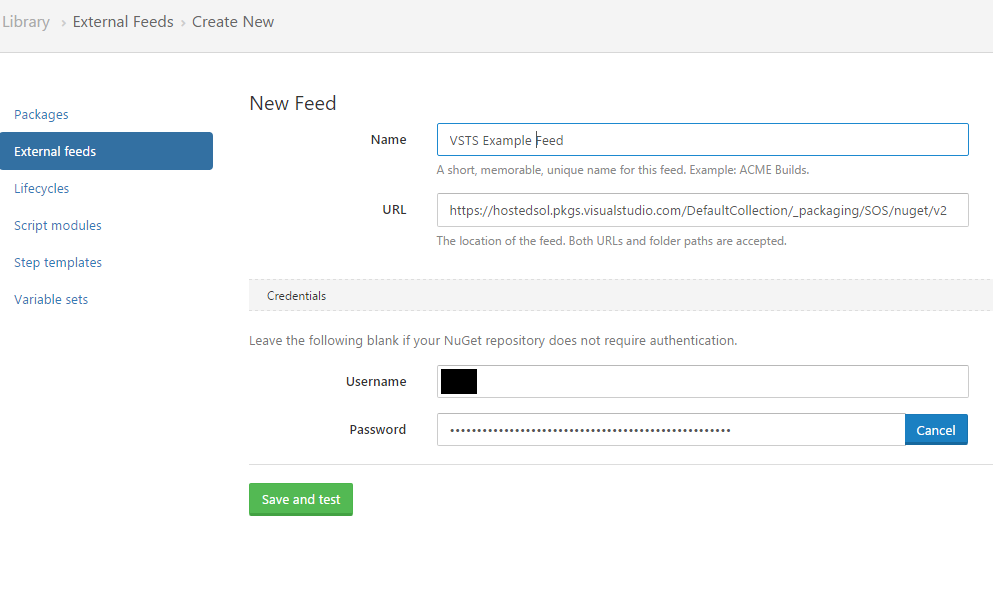
  2. Pick up the nuget package with an Octopus Server and store variables for dev/test/prod in octopus
  3. Deploy to Telerik Platform from the octopus Tentacle
  4. Based on the octopus environment choose (dev/test/etc) use different variables, and make it available to different group

THE PROJECT

First of all, the project itself. So the Build server in this instance isn’t going to build anything, its just going to package it. so we simply need to add a nuspec file to the project in Visual Studio, example below


<?xml version="1.0" encoding="utf-8" ?>
<package xmlns="http://schemas.microsoft.com/packaging/2011/08/nuspec.xsd">
 <metadata>
 <id>platform-friends-hybrid</id>
 <version>0.0.0</version>
 <title>platform-friends-hybrid deployment package</title>
 <authors>Hosted Solutions Pty Ltd</authors>
 <owners>Hosted Solutions Pty Ltd</owners>
 <requireLicenseAcceptance>false</requireLicenseAcceptance>
 <description>platform-friends-hybrid deployment package</description>
 <summary>platform-friends-hybrid deployment package</summary>
 <releaseNotes />
 <copyright>Copyright © Hosted Solutions Pty Ltd 2015</copyright>
 <language>en-US</language>
 </metadata>
 <files>
 <file src="\**\*.*" />
 <file src=".abproject" />
 <file src=".debug.abproject" />
 <file src=".release.abproject" />
 </files>
</package>

Now in this example you will note the files beginning with a “.” i had to add individually. this is because they aren’t picked up by “*.*”

You also need to manually add the packages.config for nuget with a reference to octopack. This will package up the files for you into the nuget format octopus needs.

This Commit in github has the full details (https://github.com/HostedSolutions/platform-friends-hybrid/commit/467c2f06fdb5d123021250902cf0035bf5806790)

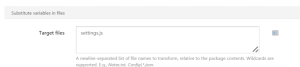
Finally we need to change the file /scripts/app/settings.js, so that we can token replace the variables, the need to be in a format of #{VaribleName] for octopus, below is an exmaple


var appSettings = {

everlive: {
 apiKey: '#{EVERLIVE_API_KEY}', // Put your Backend Services API key here
 scheme: 'http'
 },

THE BUILD

To get this to build on your build server you will need to download and install the Visual Studio Extension on your build server as well (https://platform.telerik.com/#workspaces and go to “Getting Started” -> “Downloads” -> “App Builder Hybrid”)

AppBuilderExtentionForVisualStudio

In my build in TeamCity to make this work I’ve got 4 steps

BuildStepsInTeamCity

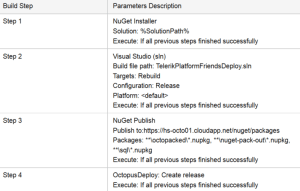
These are very similar to what i outlined in this post (https://beerandserversdontmix.com/2015/09/30/tfs-teamcity-nuget-octopus-somewhere/)

The main difference is I’ve had to add an extra build configuration parameter like this

/p:OctoPackNuGetArguments=-NoDefaultExcludes

This makes Octopack pass an additional parameter to nuget when it does the packaging, without this it refuses to pickup the files beginning with the “.”

Now this will package up our solution to be built on the deployment server, it wont actually do any building.

THE DEPLOY (BUILD)

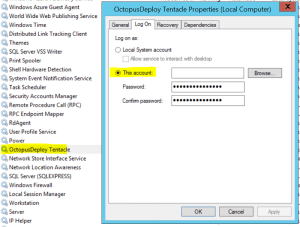
I’ve got a few projects that are odd like this, where i end up pushing from Octopus to a remote environment to then onward deploy, its not unusual I think, but still not common. So we ended up creating a machine specific in one of our setups for just running scripts, in my smaller setup we just drop a tentacle on our octopus server though.

I’m using an octopus server with a tentacle on it in this example.

First we need to get node js on the box (https://nodejs.org/download/release/latest-v0.12.x/node-v0.12.7-x86.msi)

The tricky bit here is that nodejs with AppManager CLI runs out of the User Profile, so What i have done is set the Tentacle on the box to run a a local User Account (if you are in a domain i recommend an AD account), make sure it a local administrator on the box the tentacle is installed on.

OctopusDeployTentacleChangeUser

Once this is done login as this user to install and setup nodejs and AppManager CLI with the command line

npm install appbuilder -g

npmInstallAppBuilderCommandLine

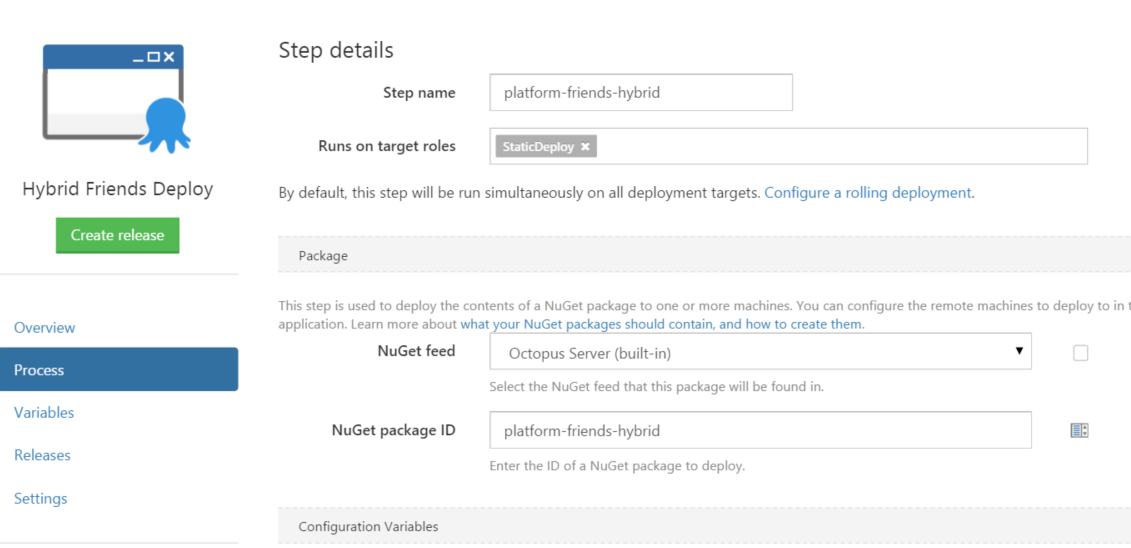
Now that that is ready you need to setup a project in Octopus

CreateStepInOctopusDeployTelerikAppBuilder

Make sure you select the substitute Variable Step Feature.

OctopusDeployStepSubstituteVarible

And you will need to add you JavaScript Settings file to the list once this is enabled.

OctopusDeploySettingsJsSubstitute

The setup the variables in the variable section.

OctopusDeployAddVariblesTelerik

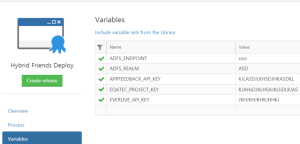
And for each variable you will probably want to set a different scope per environment.

OctopusDeployVaribleScopeTelerik

Then add a step template

I’ve put notes for my original powershell script here (https://github.com/HostedSolutions/platform-friends-hybrid/blob/master/NotesOctopusStepTemplate.ps1)

And a full step template for octopus here (https://github.com/HostedSolutions/platform-friends-hybrid/blob/master/OctopusStepTemplate.json)

Now i’ll just walk through a few of the things in the powershell and why we are doing things that way.


# Setup Group Command
$GroupCmd =" --group " + $GroupAccessList.Replace(","," --group ");
$GroupCmd=$GroupCmd.Replace(" "," ").Replace(" "," ")

This code above is for giving the option for various groups to be able to access different deployments. For example, we have Dev and Test, the developers have access to both Dev and Test, but only our testers have access to Test, because we allow the developers to “mess around” with dev, which may cause false positive results in testing.


$currentstepname = $OctopusParameters["Octopus.Step[0].Package.NuGetPackageId"]

We expect the previous step to this one to be the Telerik Nuget Package step, if it is not this will fail.


CMD /C C:\"Program Files (x86)"\nodejs\npm update -g appbuilder; $LASTEXITCODE

We run an update command to make sure that we are on the latest version of AppBuilder, if AppBuilder is not the latest version it will fail


$AppData = $env:APPDATA

AppBuilder runs from the local user profile, so we need to use the AppData folder path

$JSON = (Get-Content "$parentLocation\.abproject" -Raw) | ConvertFrom-Json; 

# Set values in object
$JSON.ProjectName = $ProjectName; 
$JSON.AppIdentifier = $AppIdentifier; 
$JSON.DisplayName = $DisplayName;
$JSON.BundleVersion = $OctopusReleaseNumber; 

$JSON | ConvertTo-Json | Set-Content "$parentLocation\.abproject"

We modify values in the .abproject file to set things like the version number and also the app name (we prefix dev with “Dev” and Test with “Test” so using the example above where a developer has both dev and test on their phone, that the developers when they are using the app on their phone know which one is which.

CMD /C $APPDATA\npm\appbuilder dev-telerik-login $TelerikUserName $TelerikPassword       IF ($LASTEXITCODE -ne 0) { Write-Error "Error"}

Login to telerik platform

CMD /C $APPDATA\npm\appbuilder appmanager upload android --certificate $AndriodCertID --publish --send-push $GroupCmd;$LASTEXITCODE;IF ($LASTEXITCODE -ne 0) { Write-Error "error"}

Uploads to android

CMD /C $APPDATA\npm\appbuilder appmanager upload ios     --certificate $iOSCertID --provision $iOSProvitionID --publish $SendPushCmd $GroupCmd;$LASTEXITCODE;IF ($LASTEXITCODE -ne 0) { Write-Error "error"}

Uploads the iOS version
We normally set the Group Access list to a variable, so that it can be varied per environment.
TelerikGroupAccessListVarible

So we then end up with the steps like so in octopus

StepsOctopusDeployTelerikPlatform

Once deployed to Telerik Platform our version number are in sync with Octopus and Team City as well as our Source control labels. And we end up with seperate apps for Dev,Test , etc. and in the event you are accessing services you can token replace the right scoped variable so that the “Test Mobile App” accesses the “Test Web API” and so on.

And there you have it, TFVC -> TeamCity -> Octopus Deploy -> Telerik Platform