Starting a Paved Path with .NET Templates

“Good templates are like good habits – they make doing the right thing easy and automatic.” – Scott Hanselman, Principal Program Manager at Microsoft

In our previous post, we introduced the concept of paved paths as a solution to the challenges posed by monolithic architectures and mono repos. Today, we’re going to dive into the technical details of how to implement a key component of paved paths: new project templates. We’ll use .NET as our example, demonstrating how to create custom templates that embody your organization’s best practices and preferred setup.

Why .NET Templates?

.NET templates are an excellent tool for implementing paved paths because they allow you to:

  1. Standardize project structure and initial setup
  2. Embed best practices and common configurations
  3. Quickly bootstrap new services or applications
  4. Ensure consistency across different teams and projects

Getting Started with .NET Templates

The .NET CLI provides a powerful templating engine that we can leverage to create our paved path templates. Let’s walk through the process of creating a custom template.

Step 1: Create a Template Project

First, let’s create a new project that will serve as our template:

dotnet new webapi -n MyCompany.Template.WebApi

This creates a new Web API project that we’ll customize to serve as our template.

Step 2: Customize the Template

Now, let’s make some modifications to this project to align it with our organization’s standards. For example:

  1. Add common NuGet packages
  2. Set up a standard folder structure
  3. Add common middleware or services
  4. Configure logging and monitoring

Here’s an example of how you might modify the Program.cs file:

using MyCompany.Shared.Logging;
using MyCompany.Shared.Monitoring;

var builder = WebApplication.CreateBuilder(args);

// Add services to the container.
builder.Services.AddControllers();
builder.Services.AddEndpointsApiExplorer();
builder.Services.AddSwaggerGen();

// Add MyCompany standard services
builder.Services.AddMyCompanyLogging();
builder.Services.AddMyCompanyMonitoring();

var app = builder.Build();

// Configure the HTTP request pipeline.
if (app.Environment.IsDevelopment())
{
    app.UseSwagger();
    app.UseSwaggerUI();
}

app.UseHttpsRedirection();
app.UseAuthorization();
app.MapControllers();

// Use MyCompany standard middleware
app.UseMyCompanyLogging();
app.UseMyCompanyMonitoring();

app.Run();

Step 3: Create Template Configuration

Next, we need to add a special configuration file that tells the .NET CLI how to treat this project as a template. Create a new folder in your project called .template.config, and inside it, create a file called template.json:

{
  "$schema": "http://json.schemastore.org/template",
  "author": "Your Name",
  "classifications": [ "Web", "WebAPI" ],
  "name": "MyCompany Web API",
  "identity": "MyCompany.WebApi.Template",
  "groupIdentity": "MyCompany.WebApi",
  "shortName": "mycompany-webapi",
  "tags": {
    "language": "C#",
    "type": "project"
  },
  "sourceName": "MyCompany.Template.WebApi",
  "preferNameDirectory": true
}

This configuration file defines metadata about your template and tells the .NET CLI how to use it.

Step 4: Package the Template

Now that we have our template project set up, we need to package it for distribution. We can do this by creating a NuGet package. Add the following to your .csproj file:

<Project Sdk="Microsoft.NET.Sdk.Web">
  <PropertyGroup>
    <PackageType>Template</PackageType>
    <PackageVersion>1.0</PackageVersion>
    <PackageId>MyCompany.WebApi.Template</PackageId>
    <Title>MyCompany Web API Template</Title>
    <Authors>Your Name</Authors>
    <Description>Web API template for MyCompany projects</Description>
    <PackageTags>dotnet-new;templates;mycompany</PackageTags>

    <TargetFramework>net6.0</TargetFramework>
    <ImplicitUsings>enable</ImplicitUsings>
    <Nullable>enable</Nullable>

    <IncludeContentInPack>true</IncludeContentInPack>
    <IncludeBuildOutput>false</IncludeBuildOutput>
    <ContentTargetFolders>content</ContentTargetFolders>
  </PropertyGroup>

  <ItemGroup>
    <Content Include="**\*" Exclude="**\bin\**;**\obj\**" />
    <Compile Remove="**\*" />
  </ItemGroup>
</Project>

Step 5: Build and Pack the Template

Now you can build and pack your template:

dotnet pack

This will create a NuGet package in the bin/Debug or bin/Release folder, depending on your build configuration.

Step 6: Install and Use the Template

To use your new template, you first need to publish it to your internal nuget server and then you can install:

dotnet new -i MyCompany.WebApi.Template --nuget-source https://your.internal.nuget

Now you can use your template to create new projects:

dotnet new mycompany-webapi -n MyNewWebApi

Maintaining and Updating Templates

As your organization’s needs evolve, you’ll want to update your templates. Here are some tips for maintaining your templates:

  1. Version your templates and keep a changelog
  2. Regularly review and update dependencies
  3. Collect feedback from developers using the templates
  4. Consider creating multiple templates for different use cases

Conclusion

By creating custom .NET templates, we’ve taken a significant step in implementing paved paths in our organization. These templates encapsulate our best practices, preferred project structure, and common configurations, making it easy for developers to start new projects that align with our standards.

Remember, templates are just one part of a paved path strategy. In future posts, we’ll explore other aspects such as shared libraries, infrastructure as code, and CI/CD pipelines. Stay tuned!

Scaling Dependency Injection: How Agoda Solved DI Challenges with Agoda.IoC

Introduction

In the world of modern software development, Dependency Injection (DI) has become an essential technique for building maintainable, testable, and scalable applications. By allowing us to decouple our code and manage object lifecycles effectively, DI has revolutionized how we structure our applications.

However, as projects grow in size and complexity, even the most beneficial practices can become challenging to manage. This is especially true for large-scale applications with hundreds of developers and thousands of components. At Agoda, we faced this exact challenge with our dependency injection setup, and we’d like to share how we overcame it.

In this post, we’ll explore the problems we encountered with traditional DI approaches at scale, and introduce Agoda.IoC, our open-source solution that has transformed how we handle dependency injection across our codebase.

The Problem: DI at Scale

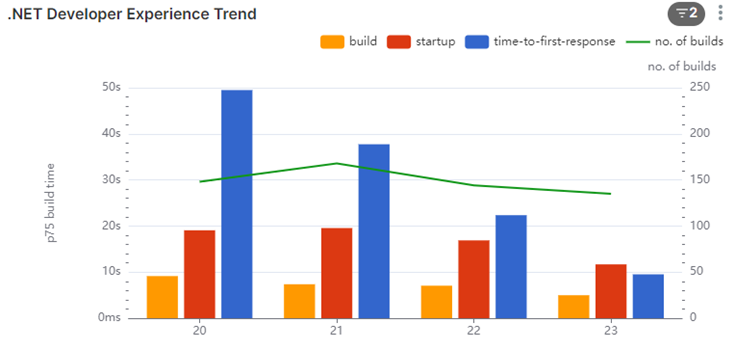
To understand the magnitude of the challenge we faced, let’s first consider the scale at which Agoda operates its customer facing website:

  • In an average month, we merge over 260 pull requests
  • We add more than 38,000 lines of code
  • We have around 100 active engineers contributing to our codebase

Stats from 2021

With such a large and active development environment, our traditional approach to dependency injection began to show its limitations. Like many .NET projects, we were using the built-in DI container, registering our services in the Startup.cs file or through extension methods. It looked something like this:

public void ConfigureServices(IServiceCollection services)
{
    services.AddSingleton<IService, Service>();
    services.AddTransient<IRepository, Repository>();
    // ... hundreds more registrations
}

While this approach works well for smaller projects, we encountered several significant issues as our codebase grew:

  1. Merge Conflicts: With numerous developers working on different features, all needing to register new services, our Startup.cs file became a constant source of merge conflicts. This slowed down our development process and created unnecessary friction.
  2. Lack of Visibility into Object Lifecycles: As our registration code grew and was split into multiple methods and even separate files, it became increasingly difficult for developers to understand the lifecycle of a particular service without digging through configuration code. This lack of visibility could lead to subtle bugs, especially when dealing with scoped or singleton services that might inadvertently capture user-specific data.
  3. Maintenance Nightmare: Our main configuration class ballooned to nearly 4,000 lines of code at its peak. This made it incredibly difficult to maintain, understand, and modify our DI setup.

These issues were not just minor inconveniences. They were actively hindering our ability to develop and release products quickly and reliably. We needed a solution that would allow us to scale our dependency injection along with our codebase and team size.

The “Just Break It Up” Approach

When faced with a massive configuration file, the knee-jerk reaction is often to break it up into smaller pieces. This might look something like this:

public void ConfigureServices(IServiceCollection services)
{
    services.AddDataServices()
            .AddBusinessServices()
            .AddInfrastructureServices();
    // ... more method calls
}

public static class ServiceCollectionExtensions
{
    public static IServiceCollection AddDataServices(this IServiceCollection services)
    {
        services.AddSingleton<IDatabase, Database>();
        services.AddTransient<IUserRepository, UserRepository>();
        // ... more registrations
        return services;
    }

    // ... more extension methods
}

This pattern can make your Startup.cs look cleaner, but it’s really just hiding the complexity rather than addressing it. The registration logic is still centralized, just in different files. This can actually make it harder to find where a particular service is registered, exacerbating our visibility problem.

Introducing Agoda.IoC

To address the challenges we faced with dependency injection at scale, we developed Agoda.IoC, an open-source C# IoC extension library. Agoda.IoC takes a different approach to service registration, moving away from centralized configuration and towards a more distributed, attribute-based model. In building it we also pulled out a bunch of complex but handy registration patterns we found in use.

Agoda.IoC uses C# attributes to define how services should be registered with the dependency injection container. This approach brings several benefits:

  1. Decentralized Configuration: Each service is responsible for its own registration, reducing merge conflicts and improving code organization.
  2. Clear Visibility of Lifecycles: The lifetime of a service is immediately apparent when viewing its code.
  3. Simplified Registration Process: No need to manually add services to a configuration file; the library handles this automatically.

Let’s look at some examples of how Agoda.IoC works in practice:

Basic Registration

Consider a logging service that you want to use throughout your application:

public interface ILogger {}

[RegisterSingleton]
public class Logger : ILogger {}

This replaces the traditional services.AddSingleton<ILogger, Logger>(); in your startup code. By using the [RegisterSingleton] attribute, you ensure that only one instance of Logger is created and used throughout the application’s lifetime. This is ideal for stateless services like loggers, configuration managers, or caching services.

The interface is used to register the class by default.

Factory Registration

Factory registration is useful for services that require complex initialization or depend on runtime parameters. For example, let’s consider a database connection service:

[RegisterSingleton(Factory = typeof(DatabaseConnectionFactory))]
public class DatabaseConnection : IDatabaseConnection
{
    private readonly string _connectionString;
    
    public DatabaseConnection(string connectionString)
    {
        _connectionString = connectionString;
    }
    
    // implementation here
}

public class DatabaseConnectionFactory : IComponentFactory<IDatabaseConnection>
{
    public IDatabaseConnection Build(IComponentResolver resolver)
    {
        var config = resolver.Resolve<IConfiguration>();
        string connectionString = config.GetConnectionString("DefaultConnection");
        return new DatabaseConnection(connectionString);
    }
}

This approach allows you to create a DatabaseConnection with a connection string that’s only known at runtime. The factory can use the IComponentResolver to access other registered services (like IConfiguration) to build the connection.

Explicit Interface Registration

When a class implements multiple interfaces but should only be registered for one, explicit interface registration comes in handy. This is particularly useful in scenarios where you’re adapting third-party libraries or creating adapters:

[RegisterTransient(For = typeof(IExternalServiceAdapter))]
public class ExternalServiceAdapter : IExternalServiceAdapter, IDisposable
{
    private readonly ExternalService _externalService;
    
    public ExternalServiceAdapter(ExternalService externalService)
    {
        _externalService = externalService;
    }
    
    // IExternalServiceAdapter implementation
    
    public void Dispose()
    {
        _externalService.Dispose();
    }
}

In this case, we only want to register ExternalServiceAdapter as IExternalServiceAdapter, not as IDisposable. This prevents other parts of the application from accidentally resolving this class when they ask for an IDisposable.

Collection Registration

Collection registration is powerful when you have multiple implementations of an interface that you want to use together, such as in a pipeline pattern or for plugin-like architectures. Here’s an example with a simplified order processing pipeline:

public interface IOrderProcessor
{
    void Process(Order order);
}

[RegisterSingleton(For = typeof(IOrderProcessor), OfCollection = true, Order = 1)]
public class ValidateOrderProcessor : IOrderProcessor
{
    public void Process(Order order) 
    {
        // Validate the order
    }
}

[RegisterSingleton(For = typeof(IOrderProcessor), OfCollection = true, Order = 2)]
public class InventoryCheckProcessor : IOrderProcessor
{
    public void Process(Order order) 
    {
        // Check inventory
    }
}

[RegisterSingleton(For = typeof(IOrderProcessor), OfCollection = true, Order = 3)]
public class PaymentProcessor : IOrderProcessor
{
    public void Process(Order order) 
    {
        // Process payment
    }
}

With this setup, you can inject IEnumerable<IOrderProcessor> into a service that needs to run all processors in order:

public class OrderService
{
    private readonly IEnumerable<IOrderProcessor> _processors;
    
    public OrderService(IEnumerable<IOrderProcessor> processors)
    {
        _processors = processors;
    }
    
    public void ProcessOrder(Order order)
    {
        foreach (var processor in _processors)
        {
            processor.Process(order);
        }
    }
}

This approach allows you to easily add or remove processing steps without changing the OrderService class.

Keyed Registration

Keyed registration allows you to register multiple implementations of the same interface and retrieve them by a specific key. This is particularly useful when you need different implementations based on runtime conditions.

Example scenario: Multiple payment gateways in an e-commerce application.

public interface IPaymentGateway
{
    bool ProcessPayment(decimal amount);
}

[RegisterSingleton(Key = "Stripe")]
public class StripePaymentGateway : IPaymentGateway
{
    public bool ProcessPayment(decimal amount)
    {
        // Stripe-specific payment processing logic
        return true;
    }
}

[RegisterSingleton(Key = "PayPal")]
public class PayPalPaymentGateway : IPaymentGateway
{
    public bool ProcessPayment(decimal amount)
    {
        // PayPal-specific payment processing logic
        return true;
    }
}

public class PaymentService
{
    private readonly IKeyedComponentFactory<IPaymentGateway> _gatewayFactory;

    public PaymentService(IKeyedComponentFactory<IPaymentGateway> gatewayFactory)
    {
        _gatewayFactory = gatewayFactory;
    }

    public bool ProcessPayment(string gatewayName, decimal amount)
    {
        var gateway = _gatewayFactory.GetByKey(gatewayName);
        return gateway.ProcessPayment(amount);
    }
}

In this example, you can switch between payment gateways at runtime based on user preference or other factors.

Mocked Mode for Testing

Agoda.IoC provides a mocked mode that allows you to easily swap out real implementations with mocks for testing purposes. This is particularly useful for isolating components during unit testing.

Example scenario: Testing a user service that depends on a database repository.

public interface IUserRepository
{
    User GetUserById(int id);
}

[RegisterSingleton(Mock = typeof(MockUserRepository))]
public class UserRepository : IUserRepository
{
    public User GetUserById(int id)
    {
        // Actual database call
        return new User { Id = id, Name = "Real User" };
    }
}

public class MockUserRepository : IUserRepository
{
    public User GetUserById(int id)
    {
        // Return a predefined user for testing
        return new User { Id = id, Name = "Mock User" };
    }
}

public class UserService
{
    private readonly IUserRepository _userRepository;

    public UserService(IUserRepository userRepository)
    {
        _userRepository = userRepository;
    }

    public string GetUserName(int id)
    {
        var user = _userRepository.GetUserById(id);
        return user.Name;
    }
}

When running in normal mode, the real UserRepository will be used. In mocked mode (typically during testing), the MockUserRepository will be injected instead, allowing for predictable test behavior without actual database calls.

Open Generic Service Registration

Agoda.IoC supports registration of open generic services, which is particularly useful when you have a generic interface with multiple implementations.

Example scenario: A generic repository pattern in a data access layer.

public interface IRepository<T> where T : class
{
    T GetById(int id);
    void Save(T entity);
}

[RegisterTransient(For = typeof(IRepository<>))]
public class GenericRepository<T> : IRepository<T> where T : class
{
    public T GetById(int id)
    {
        // Generic implementation
    }

    public void Save(T entity)
    {
        // Generic implementation
    }
}

// Usage
public class UserService
{
    private readonly IRepository<User> _userRepository;

    public UserService(IRepository<User> userRepository)
    {
        _userRepository = userRepository;
    }

    // Service implementation
}

With this setup, Agoda.IoC will automatically create and inject the appropriate GenericRepository<T> when an IRepository<T> is requested for any type T.

These advanced features of Agoda.IoC provide powerful tools for handling complex dependency injection scenarios, from runtime-determined implementations to easier testing and support for generic patterns. By leveraging these features, you can create more flexible and maintainable application architectures.

Implementing Agoda.IoC in Your Project

Now that we’ve explored the features and benefits of Agoda.IoC, let’s walk through the process of implementing it in your .NET project. This guide will cover installation, basic setup, and the migration process from traditional DI registration.

First, you’ll need to install the Agoda.IoC package. You can do this via the NuGet package manager in Visual Studio or by running the following command in your project directory:

dotnet add package Agoda.IoC.NetCore

Basic Setup

Once you’ve installed the package, you need to set up Agoda.IoC in your application’s startup code. The exact location depends on your project structure, but it’s typically in the Startup.cs file for traditional ASP.NET Core projects or in Program.cs for minimal API projects.

For a minimal API project (Program.cs):

using Agoda.IoC.NetCore;

var builder = WebApplication.CreateBuilder(args);

// Your existing service configurations...

// Add this line to set up Agoda.IoC
builder.Services.AutoWireAssembly(new[] { typeof(Program).Assembly }, isMockMode: false);

var app = builder.Build();
// ... rest of your program

The AutoWireAssembly method takes two parameters:

  1. An array of assemblies to scan for registrations. Typically, you’ll want to include your main application assembly.
  2. A boolean indicating whether to run in mock mode (useful for testing, as we saw in the advanced features section).

Before:

// In Startup.cs
services.AddSingleton<IEmailService, EmailService>();
services.AddTransient<IUserRepository, UserRepository>();
services.AddScoped<IOrderProcessor, OrderProcessor>();

// In your classes
public class EmailService : IEmailService { /* ... */ }
public class UserRepository : IUserRepository { /* ... */ }
public class OrderProcessor : IOrderProcessor { /* ... */ }

After:

// In Startup.cs
services.AutoWireAssembly(new[] { typeof(Startup).Assembly }, isMockMode: false);

// In your classes
[RegisterSingleton]
public class EmailService : IEmailService { /* ... */ }

[RegisterTransient]
public class UserRepository : IUserRepository { /* ... */ }

[RegisterPerRequest] // This is equivalent to AddScoped
public class OrderProcessor : IOrderProcessor { /* ... */ }

The Reflection Concern

When introducing a new library into a project, especially one that uses reflection, it’s natural to have concerns about performance.

The key point to understand is that Agoda.IoC primarily uses reflection during application startup, not during runtime execution. Here’s how it breaks down:

  1. Startup Time: Agoda.IoC scans the specified assemblies for classes with registration attributes. This process happens once during application startup.
  2. Runtime: Once services are registered, resolving dependencies uses the same mechanisms as the built-in .NET Core DI container. There’s no additional reflection overhead during normal application execution.

Agoda.IoC.Generator: Enhancing Performance with Source Generators

While the reflection-based approach of Agoda.IoC is performant for most scenarios, we understand that some projects, especially those targeting AOT (Ahead-of-Time) compilation, may require alternatives. This is where Agoda.IoC.Generator comes into play.

To use Agoda.IoC.Generator, you simply need to add it to your project alongside Agoda.IoC. The source generator will automatically detect the Agoda.IoC attributes and generate the appropriate registration code.

By offering both reflection-based and source generator-based solutions, we ensure that Agoda.IoC can meet the needs of a wide range of projects, from traditional JIT-compiled applications to those requiring AOT compilation.

Conclusion: Embracing Agoda.IoC for Scalable Dependency Injection

As we’ve explored throughout this blog post, dependency injection is a crucial technique for building maintainable and scalable applications. However, as projects grow in size and complexity, traditional DI approaches can become unwieldy. This is where Agoda.IoC steps in.

Let’s recap the key benefits of Agoda.IoC:

  1. Decentralized Configuration: By moving service registration to attributes on the classes themselves, Agoda.IoC eliminates the need for a centralized configuration file. This reduces merge conflicts and makes it easier to understand the lifecycle of each service.
  2. Improved Code Organization: With Agoda.IoC, the registration details are right where they belong – with the service implementations. This improves code readability and maintainability.
  3. Flexibility: From basic registrations to more complex scenarios like keyed services and open generics, Agoda.IoC provides the flexibility to handle a wide range of dependency injection needs.
  4. Testing Support: The mocked mode feature makes it easier to write and run unit tests, allowing you to easily swap out real implementations for mocks.
  5. Performance: Despite using reflection, Agoda.IoC is designed to be performant, with minimal impact on startup time and runtime performance. And for scenarios requiring AOT compilation, Agoda.IoC.Generator provides a source generator-based alternative.
  6. Scalability: As your project grows from a small application to a large, complex system, Agoda.IoC scales with you, maintaining clean and manageable dependency registration.

At Agoda, we’ve successfully used this library to manage dependency injection in our large-scale applications, handling thousands of services across a team of hundreds of developers. It has significantly reduced the friction in our development process and helped us maintain a clean, understandable codebase even as our systems have grown.

Of course, like any tool, Agoda.IoC isn’t a silver bullet. It’s important to understand your project’s specific needs and constraints. For some smaller projects, the built-in DI container in .NET might be sufficient. For others, especially larger, more complex applications, Agoda.IoC can provide substantial benefits.

We encourage you to give Agoda.IoC a try in your projects. Start with the basic features, and as you become more comfortable, explore the advanced capabilities like keyed registration and collection registration. We believe you’ll find, as we have, that it makes managing dependencies in large projects significantly easier and more maintainable.

In the end, the goal of any development tool or practice is to make our lives as developers easier and our code better. We believe Agoda.IoC does just that for dependency injection in .NET applications. We hope you’ll find it as useful in your projects as we have in ours.

7 Golden Rules for Library Development: Ensuring Stability and Reliability

As software engineers, we often rely on libraries to streamline our development process and enhance our applications. However, creating and maintaining a library comes with great responsibility. In this post, we’ll explore five essential practices that every library developer should follow to ensure their code remains stable, reliable, and user-friendly.

Before we dive in, let’s consider this famous quote from Linus Torvalds, the creator of Linux:

“WE DO NOT BREAK USERSPACE!”

This statement encapsulates a core principle of software development, especially relevant to library creators. It underscores the importance of maintaining compatibility and stability for the end-users of our code.

1. Preserve Contract Integrity: No Breaking Changes

The cardinal rule of library development is to never introduce breaking changes to your public contracts. This means:

  • Use method overloads instead of modifying existing signatures
  • Add new properties rather than altering existing ones
  • Think critically about your public interfaces before implementation

Remember, the urge to “make the code cleaner” is rarely a sufficient reason to break existing contracts. Put more effort into designing robust public interfaces from the start.

Code Examples

Let’s look at some examples in Kotlin to illustrate how to preserve contract integrity:

C# Examples

using System;

// Original version
public class UserService
{
    public void CreateUser(string name, string email)
    {
        // Implementation
    }
}

// Good: Adding an overload instead of modifying the existing method
public class UserService
{
    public void CreateUser(string name, string email)
    {
        // Original implementation
    }
    
    public void CreateUser(string name, string email, int age)
    {
        // New implementation that includes age
    }
}

// Bad: Changing the signature of an existing method
public class UserService
{
    // This would break existing code
    public void CreateUser(string name, string email, int age)
    {
        // Modified implementation
    }
}

// Good: Adding a new property instead of modifying an existing one
public class User
{
    public int Id { get; set; }
    public string Name { get; set; }
    public string Email { get; set; }
    public DateTime CreatedAt { get; set; } = DateTime.UtcNow; // New property with a default value
}

// Better: Avoid using primitives in parameters
public class UserService
{
    public void CreateUser(User user)
    {
        // Modified implementation
    }
}

2. Maintain Functional Consistency

Contract changes are the basic one that people are usually aware of, functional changes are changes that change what you expect from a library under a given condition, this is a little harder, but again its a simple practice to follow to achieve it.

Functional consistency is crucial for maintaining trust with your users. To achieve this:

  • Have good test coverage
  • Only add new tests; never modify existing tests

This approach ensures that you don’t inadvertently introduce functional changes that could disrupt your users’ applications.

3. Embrace the “Bug” as a Feature

Counter-intuitive as it may seem, fixing certain bugs can sometimes do more harm than good. Here’s why:

  • Users often build their code around existing behavior, including bugs
  • Changing this behavior, even if it’s “incorrect,” can break dependent systems, and cause more problems than you fix

Unless you can fix a bug without modifying existing tests, it’s often safer to leave it be and document the behavior thoroughly.

4. Default to Non-Public Access: Minimize Your Public API Surface

When developing libraries, it’s crucial to be intentional about what you expose to users. A good rule of thumb is to default to non-public access for all elements of your library. This approach offers several significant benefits for both library maintainers and users.

Firstly, minimizing your public API surface provides you with greater flexibility for future changes. The less you expose publicly, the more room you have to make internal modifications without breaking compatibility for your users. This flexibility is invaluable as your library evolves over time.

Secondly, a smaller public API reduces your long-term maintenance burden. Every public API element represents a commitment to long-term support. By keeping this surface area minimal, you effectively decrease your future workload and the potential for introducing breaking changes.

Lastly, a more focused public API often results in a clearer, more understandable interface for your users. When users aren’t overwhelmed with unnecessary public methods or properties, they can more easily grasp the core functionality of your library and use it effectively.

To implement this principle effectively, consider separating your public interfaces and contracts into a distinct area of your codebase, or even into a separate project or library. This separation makes it easier to manage and maintain your public API over time.

Once an element becomes part of your public API, treat it as a long-term commitment. Any changes to public elements should be thoroughly considered and, ideally, avoided if they would break existing user code. This careful approach helps maintain trust with your users and ensures the stability of projects that depend on your library.

In languages that support various access modifiers, use them judiciously. Employ ‘internal’, ‘protected’, or ‘private’ modifiers liberally, reserving ‘public’ only for those elements that are explicitly part of your library’s interface. This practice helps enforce the principle of information hiding and gives you more control over your library’s evolution.

For the elements you do make public, provide comprehensive documentation. Thorough documentation helps users understand the intended use of your API and can prevent misuse that might lead to dependency on unintended behavior.

Consider the following C# example:

// Public API - in a separate file or project
public interface IUserService
{
    User CreateUser(string name, string email);
    User GetUser(int id);
}

// Implementation - in the main library project
internal class UserService : IUserService
{
    public User CreateUser(string name, string email)
    {
        // Implementation
    }

    public User GetUser(int id)
    {
        // Implementation
    }

    // Internal helper method - can be changed without affecting public API
    internal void ValidateUserData(string name, string email)
    {
        // Implementation
    }
}

In this example, only the IUserService interface is public. The actual implementation (UserService) and its helper methods are internal, providing you with the freedom to modify them as needed without breaking user code.

Remember, anything you make public becomes part of your contract with users. By keeping your public API surface as small as possible, you maintain the maximum flexibility to evolve your library over time while ensuring stability for your users. This approach embodies the spirit of Linus Torvalds’ mandate: “WE DO NOT BREAK USERSPACE!” It allows you to respect your users’ time and effort by providing a stable, reliable foundation for their projects.

6. Avoid Transient Dependencies: Empower Users with Flexibility

An often overlooked aspect of library design is the management of dependencies. While it’s tempting to include powerful third-party libraries to enhance your functionality, doing so can lead to unforeseen complications for your users. Instead, strive to minimize transient dependencies and provide mechanisms for users to wire in their own implementations. This approach not only reduces potential conflicts but also increases the flexibility and longevity of your library.

Consider a scenario where your library includes functions for pretty-printing output. Rather than hardcoding a dependency on a specific logging or formatting library, design your interface to accept generic logging or formatting functions. This allows users to integrate your library seamlessly with their existing tools and preferences.

Here’s an example of how you might implement this in C#:

// Instead of this:
public class PrettyPrinter
{
    private readonly ILogger _logger;

    public PrettyPrinter()
    {
        _logger = new SpecificLogger(); // Forcing a specific implementation
    }

    public void Print(string message)
    {
        var formattedMessage = FormatMessage(message);
        _logger.Log(formattedMessage);
    }
}

// Do this:
public class PrettyPrinter
{
    private readonly Action<string> _logAction;

    public PrettyPrinter(Action<string> logAction)
    {
        _logAction = logAction ?? throw new ArgumentNullException(nameof(logAction));
    }

    public void Print(string message)
    {
        var formattedMessage = FormatMessage(message);
        _logAction(formattedMessage);
    }
}
// Or this: (When the framework has support for generic implementations like logging and DI)
public class PrettyPrinter
{
    private readonly ILogger _logger;

    public PrettyPrinter(ILogger<PrettyPrinter> logger)
    {
        _logger = logger ?? throw new ArgumentNullException(nameof(logger));
    }

    public void Print(string message)
    {
        var formattedMessage = FormatMessage(message);
        _logger.LogInformation(formattedMessage);
    }
}

In the improved version, users can provide their own logging function, which could be from any logging framework they prefer or even a custom implementation. This approach offers several benefits:

  1. Flexibility: Users aren’t forced to adopt a logging framework they may not want or need.
  2. Reduced Conflicts: By not including a specific logging library, you avoid potential version conflicts with other libraries or the user’s own code.
  3. Testability: It becomes easier to unit test your library without needing to mock specific third-party dependencies.
  4. Future-proofing: Your library remains compatible even if the user decides to change their logging implementation in the future.

This principle extends beyond just logging. Apply it to any functionality where users might reasonably want to use their own implementations. Database access, HTTP clients, serialization libraries – all of these are candidates for this pattern.

By allowing users to wire in their own dependencies, you’re not just creating a library; you’re providing a flexible tool that can adapt to a wide variety of use cases and environments. This approach aligns perfectly with our overall goal of creating stable, user-friendly libraries that stand the test of time.

You can also consider writing extension libraries that add default implementations.

For example, your base Library MyLibrary doesn’t include a serializer, just the interface, and you create MyLibrary.Newtonsoft that contains the Newtonsoft Json serializer implementation for the interface in your library and wires it up for the user. This gives teh consumer the convenance of an optional default, but flexibility the change.

7. Target Minimal Required Versions: Maximize Compatibility

When developing a library, it’s tempting to use the latest features of a programming language or framework. However, this approach can significantly limit your library’s usability. A crucial principle in library development is to target the minimal required version of your language or framework that supports the features you need.

By targeting older, stable versions, you ensure that your library can be used by a wider range of projects. Many development teams, especially in enterprise environments, cannot always upgrade to the latest versions due to various constraints. By supporting older versions, you make your library accessible to these teams as well.

Here are some key considerations:

  1. Assess Your Requirements: Carefully evaluate which language or framework features are truly necessary for your library. Often, you can achieve your goals without the newest features.
  2. Research Adoption Rates: Look into the adoption rates of different versions of your target language or framework. This can help you make an informed decision about which version to target.
  3. Use Conditional Compilation: If you do need to use newer features, consider using conditional compilation to provide alternative implementations for older versions.
  4. Document Minimum Requirements: Clearly state the minimum required versions in your documentation. This helps users quickly determine if your library is compatible with their project.
  5. Consider Long-Term Support (LTS) Versions: If applicable, consider targeting LTS versions of frameworks, as these are often used in enterprise environments for extended periods.

Here’s an example in C# demonstrating how you might use conditional compilation to support multiple framework versions:

public class MyLibraryClass
{
    public string ProcessData(string input)
    {
#if NETSTANDARD2_0
        // Implementation for .NET Standard 2.0
        return input.Trim().ToUpper();
#elif NETSTANDARD2_1
        // Implementation using a feature available in .NET Standard 2.1
        return input.Trim().ToUpperInvariant();
#else
        // Implementation for newer versions
        return input.Trim().ToUpperInvariant();
#endif
    }
}

In this example, we provide different implementations based on the target framework version. This allows the library to work with older versions while still taking advantage of newer features when available.

Remember, the goal is to make your library as widely usable as possible. By targeting minimal required versions, you’re ensuring that your library can be integrated into a diverse range of projects, increasing its potential user base and overall value to the developer community.

8. Internal Libraries: Freedom with Responsibility

Yes there’s a 8th, but it only applies to internal.

While internal libraries offer more flexibility, it’s crucial not to abuse this freedom:

  • Use tools like SourceGraph to track usage of internal methods
  • Don’t let this capability become an excuse to ignore best practices
  • Strive to maintain the same level of stability as you would for public libraries

Remember, avoiding breaking changes altogether eliminates the need for extensive usage tracking, saving you time and effort in the long run.

Tips

  1. Set GenerateDocumentationFile to true in your csproj files, it will enable a static code analysis rule that errors if you don’t have xml comments for documentation of public methods. It will make you write documentation for all public methods that will help you think about “should this be public” and if the answer is yes think about the contract.
  2. Use Analyzers: Implement custom Roslyn analyzers, eslint, etc. to enforce your library’s usage patterns and catch potential misuse at compile-time. (Example)
  3. Performance Matters: Include benchmarks in your test suite to catch performance regressions early. Document performance characteristics of key operations.
  4. Version Thoughtfully: Use semantic versioning (SemVer) to communicate the nature of changes in your library. Major version changes should be avoided and reserved for breaking changes, minor versions for new features, and patches for bug fixes.

Conclusion

Developing a library is more than just writing code; it’s about creating a tool that empowers other developers and stands the test of time. By adhering to the golden rules we’ve discussed – from preserving contract integrity to targeting minimal required versions – you’re not just building a library, you’re crafting a reliable foundation for countless projects.

Remember, every public API you expose is a promise to your users. By defaulting to non-public access, avoiding transient dependencies, and embracing stability even in the face of “bugs,” you’re honoring that promise. You’re telling your users, “You can build on this with confidence.”

The words of Linus Torvalds, “WE DO NOT BREAK USERSPACE!”, serve as a powerful reminder of our responsibility as library developers. We’re not just writing code for ourselves; we’re creating ecosystems that others will inhabit and build upon.

As you develop your libraries, keep these principles in mind. Strive for clarity in your public interfaces, be thoughtful about dependencies, and always consider the long-term implications of your design decisions. By doing so, you’ll create libraries that are not just useful, but respected and relied upon.

In the end, the mark of a truly great library isn’t just in its functionality, but in its reliability, its adaptability, and the trust it builds with its users. By following these best practices, you’re well on your way to creating such a library. Happy coding, and may your libraries stand the test of time!

The F5 Experience (Testing)

Part of the F5 Experience is also running tests. Can I open my IDE and “just run the tests” after cloning a project?

Unit tests generally yes, but pretty much every other kind of test that engineers create these days (UI, Integration, end-to-end, etc.) needs complex environments managed either manually, or spawned in Kubernetes or a Docker Compose that brings your laptop to a crawl when running.

End-to-end tests I’ll leave for another day, and focus mainly on the ones with fewer hops such as UI and integration tests.

So what’s the problem here? The problem is if tests are hard to run, people won’t run them locally. They’ll wait for CI, and CI then becomes a part of the inner loop of development. You rely on it for dev feedback for code changes locally.

Even the best CI pipelines are looking at at least 5-10 minutes, the average ones even longer. So if you have to wait 10-15 minutes to validate your code changes are OK, then it’s going to make you less effective. You want the ability to run the test locally to get feedback in seconds.

Let’s first measure the problem. Below are open-source repos for Jest, Vitest, NUnit, and xUnit collectors:

These allow us to fire the data at an ingestion endpoint to get it to our Hadoop. They can be reused as well by anyone that sets up an endpoint and ingests the data.

They will also send from CI, using the username of the person that triggered the build when running in CI and the logged-in user from the engineer’s local. This allows us to compare who is triggering builds that run tests vs. if they are running on their locals.

Looking into this data on one of our larger repos, we found that there was a very low number of users running the integration tests locally, so it was a good candidate for experimentation.

When looking at the local experience, we found a readme with several command-line steps that needed to be run in order to spin up a Docker environment that worked. Also, the steps for local and CI were different, which was concerning, as this means that you may end up with tests that fail on CI but you can’t replicate locally.

Looking at this with one of my engineers, he suggested we try Testcontainers to solve the problem.

So we set up the project with Testcontainers to replace the Docker Compose.

The integration tests would now appear and be runnable in the IDE, the same as the unit tests. So we come back to our zero setup goal of the F5 Experience, and we are winning.

Also, instead of multiple command lines, you can now run dotnet test and everything is orchestrated for you (which is what the IDE does internally). Some unreliable “waits” in the Docker Compose were able to be removed because the Testcontainers orchestration takes care of this, knowing when containers are ready and able to be used (such as databases, etc.).

It did take a bit of time for our engineers to get used to it, but we can see over time the percentage of engineers running CI vs. Local is increasing, meaning our inner loop is getting faster.

Conclusion

The F5 Experience in testing is crucial for maintaining a fast and efficient development cycle. By focusing on making tests easy to run locally, we’ve seen significant improvements in our team’s productivity and the quality of our code.

Key takeaways from our experience include:

  1. Measure First: By collecting data on test runs, both in CI and locally, we were able to identify areas for improvement and track our progress over time.
  2. Simplify the Setup: Using tools like Testcontainers allowed us to streamline the process of running integration tests, making it as simple as running unit tests.
  3. Consistency is Key: Ensuring that the local and CI environments are as similar as possible helps prevent discrepancies and increases confidence in local test results.
  4. Automation Matters: Removing manual steps and unreliable waits not only saves time but also reduces frustration and potential for errors.

The journey to improve the F5 Experience in testing is ongoing. As we continue to refine our processes and tools, we should keep in mind that the ultimate goal is to empower our engineers to work more efficiently and confidently. This means constantly evaluating our testing practices and being open to new technologies and methodologies that can further streamline our workflow.

Remember, the ability to quickly and reliably run tests locally is not just about speed—it’s about maintaining the flow of development, catching issues early, and fostering a culture of quality. As we’ve seen, investments in this area can lead to tangible improvements in how our team works and the software we produce.

Let’s continue to prioritize the F5 Experience in our development practices, always striving to make it easier and faster for our engineers to write, test, and deploy high-quality code.

The F5 Experience (Speed)

Is a term I’ve been using for years; I originally learned it from a consultant I worked with at Readify years ago.

Back then we were working a lot on .NET, and Visual Studio was the go-to IDE. In Visual Studio, the button you press to debug was “F5”. So we used to ask the question:

“Can we git clone, and then just press F5 (Debug), and the application works locally?”

And also:

“What happens after this? Is it fast?”

So there are 2 parts to the F5 Experience really:

  1. Setup (is it Zero)
  2. Debug (is it fast)

Let’s start with the second part of the problem statement and what work we’ve done there.

Is it fast to build?

This is the first question we asked, so let’s measure compile time locally.

We’ve had devs report that things are slow, but it’s hard to know anecdotally because you don’t know in practice how often people need to clean build vs. incremental build vs. hot reload, and this can make a big difference.

For example, if you measure the three, and just for example’s sake they measure:

  • Clean: 25 minutes
  • Incremental: 30 seconds
  • Hot reload: 1 second

You might think, this is fine because it’s highly unlikely people need to clean build, right?

Wrong. The first step in troubleshooting any compilation error is “clean build it”, then try something else. Also, updates in dependencies can cause invalidation of cache and recalculations and re-downloading of some dependencies. With some package managers, this can take a long time. On top of this, you have your IDE reindexing, which can take a long time in some languages too. I still have bad memories about seeing IntelliJ having a 2 hr+ in-progress counter for some of our larger Scala projects years ago.

So you need to measure these to understand what the experience is actually like; otherwise, it’s just subjective opinions and guesswork. And if it is serious, solving this can have big impacts on velocity, especially if you have a large number of engineers working on a project.

How do we do this?

Most compilers have an ability to add plugins or something of the sort to enable this. We created a series of libraries for this. Here are the open-source ones for .NET and webpack/vite:

I’ll use the .NET one as an example because it’s our most mature one for backend, then go into what differences we have on client-side systems like webpack and vite later in another post.

So after adding this, we now have data in Hadoop for local compilation time for our projects.

And it was “amazing”; even for our legacy projects, it was showing 20-30 seconds, which I couldn’t believe. So I went to talk to one of our engineers and sat down and asked him:

“From when you push debug in your IDE to when the browser pops up and you can check your changes, does it take 20-30 seconds?”

He laughed.

He said it’s at least 4-5 minutes.

So we dug in a bit more. .NET has really good compilation time if you have a well-laid-out and small project structure, and this is what we were reporting. After it’s finished compiling the code though, it has to start the web server, and sometimes this takes time, especially if you have a large monolithic application that is optimized for production. In production, we do things like prewarm cache with large amounts of data. In his case, there wasn’t any mocking or optimizations done for local; it just connects to a QA server that, while having less data than production, still has enough that it impacts it in a huge way. On top of this, add remote/hybrid work, when you are downloading this over a VPN, and boom! Your startup time goes through the roof.

So what can we do? Measure this too, of course.

Let’s look a little bit at the web server lifecycle in .NET though (it’s pretty similar in other platforms):

The thread will hang on app.Run() until the web server stops; however, the web server itself has lifecycle hooks we can use. In .NET’s case, HostApplicationLifetime has an OnStarted event. So we can handle this.

However, the web browser may have “popped up,” but the page is still loading. This is because if you don’t initialize the DI dependencies of an HTTP controller before app.Run(), it will the first time the page is accessed.

So we need another measurement to complete the loop, which is:

“The time of first HTTP Request completion after startup”

This will give us the full loop of “Press F5 (Debug)” to “ready to check” on my local.

To do this, we need some middleware, which is in the .NET library mentioned above as well.

So now we have the full loop; let’s look at some data we collected:

Here’s one of our systems that takes 2-3 min to startup on an average day. We saw that there was an even higher number of 3min+ for the first request, so total waiting time of about 5 minutes. So we started to dig into why.

Before I mentioned the Web Browser “popping up,” this is the behavior on Visual Studio. Most of our engineers use Rider (or other JetBrains IDEs depending on their platform). When we looked into it, we found it wasn’t a huge load time of the first request; it was only taking about 20 seconds. What we found is that because JetBrains IDEs depended on the user opening the browser, the developer opens the browser minutes after it was ready. But why weren’t they opening it straight away? What was this other delay?

We were actually capturing another data point which proved valuable: it was the time the engineer context switches because they know it will take a few minutes, they go off and do something else.

The longer the compile and startup time, the longer they context switch (the bigger tasks they take on while waiting). It starts with checking email and Slack, to going and getting a coffee.

On some repos, we saw extreme examples of 15 to 20 min average for developers opening browsers on some days when the compile and startup time gets high. Probably a busy coffee machine on this day! 🙂

We had a look at some of our other repos that were faster:

In this one, we see that the startup is about 20-30 seconds (including compile time). The first request does take some time (we measured 5-10 seconds), but we are seeing about 30 seconds for the devs, so it’s unlikely they are context switching a lot.

We dug into this number some more though. We found most of the system owners weren’t context switching; they were waiting.

The people that were context switching were the contributors from other areas. We contacted a few of them to understand why. And they told us:

“I honestly didn’t expect it to be that fast, so after pressing debug, I would go make a coffee or do something else.”

To curb this behavior, we found that you can change Rider to pop up the browser, and by doing this, it would interrupt the devs’ context switch, and they would know it’s fast and hopefully change their behavior.

Conclusion

The F5 Experience highlights a critical aspect of developer productivity that often goes unmeasured and unoptimized. Through our investigation and data collection, we’ve uncovered several key insights:

  1. Compilation time alone doesn’t tell the whole story. The full cycle from pressing F5 to having a workable application can be significantly longer than expected.
  2. Developer behavior adapts to system performance. Slower systems lead to more context switching, which can further reduce productivity.
  3. Different IDEs and workflows can have unexpected impacts on the overall development experience.
  4. Even small changes, like automatically opening the browser in Rider, can have a positive impact on developer workflow.

By focusing on the F5 Experience, we can identify bottlenecks in the development process that might otherwise go unnoticed. This holistic approach to measuring and improving the development environment can lead to substantial gains in productivity and developer satisfaction.

Moving forward, teams should consider:

  • Regularly measuring and monitoring their F5 Experience metrics
  • Optimizing local development environments, including mocking or lightweight alternatives to production services
  • Continuously seeking feedback from developers about their workflow and pain points

Remember, the goal is not just to have fast compile times, but to create a seamless, efficient development experience that allows developers to stay in their flow and deliver high-quality code more quickly.

By prioritizing the F5 Experience, we can create development environments that not only compile quickly but also support developers in doing their best work with minimal frustration and waiting. This investment in developer experience will pay dividends in increased productivity, better code quality, and happier development teams.

Anecdote

Another thing we were capturing with this data was information like machine architecture. We noticed 3 out of about 150 Engineers working on one of our larger repos had a compile time that was 3x the others, 3-4 minutes compare to a minute or so. We also noticed they had 7th gen vs the 9th gen intel’s that most fo the engineers had at the time, so we immediately connected out IT support to get them new laptops 🙂

Performant .NET APIs

I’m going to conflate two topics here as they king of go together to make the title, the first isnt dotnet specific, its a general API principle.

Systems Should Own their Own data

If you can make this work then there’s a lot of advantages. What does this mean in practice though?

It means that tables in your database should only every be read and written by a single system, and there’s a lot of Pros around this. Essentially the below is what I am recommending you AVOID

How else to proceed though? there is several options that you may or may not be aware about, I’ll mention a few now but wont go into specifics

Backbend for Front end

Event Sourcing

Data Materialization

I’ve have other blogs on these. But what you are asking is what’s the benefit right?

If you control data from within a closed systems, its easier to control, a pattern which becomes easy here is known a “write through cache”.

Most of you will be familiar with a “Pull Through Cache”, this is the most common caching pattern, the logic flows like this

  1. Inbound request for X
  2. Check cache for key X
  3. If X found in Cache return
  4. Else Get X from Database, Update Cache, Return X

So on access we update the cache, and we set an expiry time of Y. And our data is usually stale by Y or less at any given time, unless it hits the DB and then its fresh and slow.

A write through cache is easy to implement when the same system reading is tightly couple with the system writing (or in my recommendation, the same system).

In this scenario the logic works the same, with one difference, when writing we update the cache with the object we are writing, example:

  1. Inbound update for key X
  2. Update database for key X
  3. Update Cache for key X

This way all forces a cache update and your cache is always fresh. Depending on how we implement our cache will vary on how fresh it becomes though. We could work this with local or remote cache.

For small datasets (1s or 10s of Gigabytes in size) I recommend local cache, but if we have a cluster of 3 servers for example how does this work? I generally recommend using a message bus, the example below step 3 sends a message, all APIs in a cluster subscribe to updates on this bus on startup, and use this to know when to re-request updates from DB when update events occur to keep cache fresh. In my experience this sort of pattern leads to 1-4 seconds of cache freshness, depending on your scale (slightly more if geographically distributed)

So this isn’t dotnet specific but it makes me lead to my next point. Once you have 10-15Gb of Cache in RAM, how do you handle this? how do you query it? which brings me to the next part.

Working with big-RAM

I’m going to use an example where we used immutable collections to store the data. Update means rebuild the whole collection in this case, we did this because the data updated infrequently, for more frequently updated data DONT do this.

Then used Linq to query into them, collections where 80Mb to 1.2Gb in size in RAM, and some of them had multiple keys to lookup, this was the tricky bit.

The example Data we had was Geographic data (cities, states, points of interest, etc), and we had in the collections multiple languages, so lookups generally had a “Key” plus another “Language Id” to get the correct translation.

So the initial Linq query for this was like

_cityLanguage.FirstOrDefault(x => x.Key.KeyId == cityId && x.Key.LanguageId == languageId).Value;

The results of this are below

MethodCityNumberMeanErrorStdDev
LookupCityWithLanguage60000929.3 ms17.79 ms17.48 ms

You can see the mean response here is almost a second, which isn’t nice user experience.

The next method we tried was to create a dictionary that was keyed on the two fields. To do this on a POCO you need to implement Equals and GetHash code methods so that the dictionary can Hash and compare the keys like below.

class LanguageKey
    {
        public LanguageKey(int languageId, int keyId)
        {
            LanguageId = languageId;
            KeyId = keyId;
        }
        public int LanguageId { get; }
        public int KeyId { get; }

        public override bool Equals(object obj)
        {
                if(!(obj is LanguageKey)) return false;
                var o = (LanguageKey) obj;
                return o.KeyId == KeyId && o.LanguageId == LanguageId;
        }

        public override int GetHashCode()
        {
            return LanguageId.GetHashCode() ^ KeyId.GetHashCode();
        }

        public override string ToString()
        {
            return $"{LanguageId}:{KeyId}";
        }
    }

So the code we end up with is like this for the lookup

_cityLanguage[new LanguageKey(languageId,cityId)];

And the results are

MethodCityNumberMeanErrorStdDev
LookupCityWithLanguage60000332.3 ns6.61 ns10.86 ns

Now we can see we’ve gone from milliseconds to nanoseconds a pretty big jump.

The next approach we tried is using a “Lookup” object to store the index below is the code to create the lookup and how to access it.

// in ctor warmup
lookup = _cityLanguage.ToLookup(x => new LanguageKey(x.Key.LanguageId, x.Key.KeyId));
// in method
lookup[new LanguageKey(languageId, cityId)].FirstOrDefault().Value;

And the results are similar

MethodCityNumberMeanErrorStdDev
LookupCityWithLanguage60000386.3 ns17.79 ns51.89 ns

We prefer to look at the high percentiles at Agoda though so measure APIs (usually the P90 or P99) below is a peak at how the API is handling the responses.

consistently below 4ms at P90, which is a pretty good experience.

Overall the “Write Through Cache” Approach is a winner for microservices where its common that systems own their own data.

NOTE: this testing was done on an API written in netcore 3.1, I’ll post updates on what it does when we upgrade to 6 🙂

From Code Standards to Automation with Analyzers and Code Fixes

We started to talk about standards between teams and system owners at Agoda a couple of years ago. We first started out on C#, the Idea was to come up with a list of recommendations for developers, for a few reasons.

One was we follow polyglot programming here and we would sometimes get developers more familiar with Java, JavaScript and other languages that would be working on the C# projects and would often misused or get lost in some of the features (e.g. When JavaScript developers find dynamics in C#, or Java Developer get confused with Extension Methods).

Beyond this we want to encourage a level of good practice, drawing on the knowledge of the people we have we could advise on potential pit falls and drawbacks of certain paths. In short the standards should not be prescriptive ones, as in “you must do it this way”, they should be more “Don’t do this”, but also teach at the same time, as in “Don’t do this, here’s why, and here’s some example code”. But also includes some guidance as well, as in “We recommend this way, or this, or this, or even this, depending on your context”, but we avoid “do this”.

CodeStandardsCSharpTypeScriptJavascriptScalaPloyglot

The output was the standards repository that we’ve now open sourced

It’s primarily markdown documents that allow us to easily document, and also use pull requests and issues to start conversation around changes and evolve.

But we had a “If you build it they will come” problem. We had standards, but people either couldn’t find them, didn’t read them, and even if they did, they’ll probably forget half of them within a week.

So the question was how do you go about implementing standards amongst 150 core developers and hundreds more casual contributors in the organisation?

We turned to static code analysis first, the Roslyn API in C# is one of the most mature Language Apis on the market imo. And we were able to write rules for most of the standards (especially the “Don’t do this” ones).

This gave birth to a cross department effort that resulted in a Code fix library here that we like to call Agoda Analyzers.

RoslynAnalyzersCSharpStaticCodeAnalysisLibraryTools

Initially we were able to add them into the project via the published nuget package and have them present in the IDE, and they are available here.

RoslynAnalyzerPackageRuleCodeFixes

but like most linting systems they tend to just “error” at the developer without much information, which we don’t find very helpful, so we quickly moved to Sonarqube with it’s github integration.

This allows a good experience for code reviewers and contributors. The contributor get’s inline comments on their pull request from our bot.

CodeReviewBotCommentPullRequest

This allows the user time to fix issues before they get to the code reviewers, so most common mistakes are fixed prior to code review.

Also the link (the 3 dots at the end of the comment) Deep links into sonarqube’s WebUI to documentation that we write on each rule.

CodeSmellCodeFixDocumentationHowToFixSmell

This allows for not just “Don’t do this”, but also to achieve “Don’t do this, here’s why, and here’s some example code”.

Static code analysis is not a silver bullet though, things like design patterns are hard to encompass, but we find that most of the crazy stuff you can catch with it, leaving the code review to be more about design and less about naming conventions and “wtf” moments from code reviewers when reviewing the time a node developer finds dynamics in C# for the first time and decides to have some fun.

We are also trying the same approach with other languages internally, such as TypeScript and Scala are our two other main languages we work in, so stay tuned for more on this.


The Transitive Dependency Dilemma

It sounds like the title of a Big Bang Theory episode, but its not, instead is an all to common problem that breaks the single responsibility rule that I see regularly.

And I’ve seen first hand how much butt hurt this can cause, a friend of mine (Tomz) spent 6 weeks trying to update a library in a website, the library having a breaking change.

The root cause of this issue comes from the following scenario, My Project depends on my Library 1 and 2. My Libraries both depend on the same 3rd party library (or it could be an internal one too).

TransitiveDependencyIssueNugetMavenNPM

Now lets take the example that each library refers to a different version.

TransitiveDependencyVersionMismatch

Now which version do we use, you can solve this issue in dotnet with assembly binding redirects, and nuget even does this for you (other languages have similar approaches too). However, when there is a major version bump and breaking changes it doesn’t work.

If you take the example as well of having multiple libraries (In my friend tomz case there was about 30 libraries that depended on the logging library that had a major version bump) this can get real messy real fast, and a logging library is usually the most common scenario. So lets use this as the example.

TransitiveDependencyLoggingLibrary


So what can we change to handle this better?

I point you to the single responsibility principle. In the above scenario, MyLibrary1 and 2 are now technically responsible for logging because they have a direct dependency on the logging library, this is where the problem lies. They should only be responsible for “My thing 1” and “My thing 2”, and leave the logging to another library.

There is two approaches to solve this that i can recommend, each with their own flaws.

The first is exposing an interface that you can implement in MyProject,

TransitiveDependencyIssueUseInterfacesSingleResponsibility

This also helps with if you want to reuse you library in other projects, you wont be dictating to the project how to log.

The problem with this approach though is that you end up implementing a lot of ILoggers in the parent

The other approach is to use a shared common Interfaces library.

TransitiveDependencyIssueCommonInterfaceLogging

The problem with this approach however is when you need to update the Common interfaces library with a breaking change it becomes near impossible, because you end up with most of your company depending on a single library. So I prefer the former approach.

Sonarqube with a MultiLanguage Project, TypeScript and dotnet

Sonarqube is a cool tool, but getting multiple languages to work with it can be hard, especially because each language has its own plugin maintained by different people most of the time, so the implementations are different, so for each language you need to learn a new sonar plugin.

In our example we have a frontend project using React/Typescript and dotnet for the backend.

For C# we use the standard ootb rules from microsoft, plus some of our own custom rules.

For typescript we follow a lot of recommendations from AirBnB but have some of our own tweaks to it.

In the example I am using an end to end build in series, but in reality we use build chains to speed things up so our actual solution is quite more complex than this.

So the build steps look something like this

  1. dotnet restore
  2. Dotnet test, bootstrapped with dotcover
  3. Yarn install
  4. tslint
  5. yarn test
  6. Sonarqube runner

Note: In this setup we do not get the Build Test stats in Teamcity though, so we cannot block builds for test coverage metrics.

So lets cover the dotnet side first, I mentioned our custom rules, I’ll do a separate blog post about getting them into sonar and just cover the build setup in this post.

with the dotnet restore setup is pretty simple, we do use a custom nuget.config file for our internal nuget server, i would recommend always using a custom nuget config file, your IDEs will pick this up and use its settings.


dotnet restore --configfile=%teamcity.build.workingDir%\nuget.config MyCompany.MyProject.sln

The dotnet test step is a little tricky, we need to boot strap it with dotcover.exe, using the analyse command and output HTML format that sonar will consume (yes, sonar wants the HTML format).


%teamcity.tool.JetBrains.dotCover.CommandLineTools.DEFAULT%\dotcover.exe analyse /TargetExecutable="C:\Program Files\dotnet\dotnet.exe" /TargetArguments="test MyCompany.MyProject.sln" /AttributeFilters="+:MyCompany.MyProject.*" /Output="dotCover.htm" /ReportType="HTML" /TargetWorkingDir=.

echo "this is working"

Lastly sometimes the error code on failing tests is non zero, this causes the build to fail, so by putting the second echo line here it mitigates this.

Typescript We have 3 steps.

yarn install, which just call that exact command

Out tslint step is a command line step below, again we need to use a second echo step because when there is linting errors it returns a non zero exit code and we need to process to still continue.


node ".\node_modules\tslint\bin\tslint" -o issues.json -p "tsconfig.json" -t json -c "tslint.json" -e **/*.spec.tsx -e **/*.spec.ts
echo "this is working"

This will generate an lcov report, now i need to put a disclaimer here, lcov has a problem where it only reports coverage on the files that where executed during the test, so if you have code that is never touched by tests they will not appear on your lcov report, sonarqube will give you the correct numbers. So if you get to the end and find that sonar is reporting numbers a lot lower than what you thought you had this is probably why.

Our test step just run yarn test, but here is the fill command in the package json for reference.

"scripts": {
"test": "jest –silent –coverage"
}

Now we have 3 artifacts, two coverage reports and a tslint report.

The final step takes these, runs an analysis on our C# code, then uploads everything

We use the sonarqube runner plugin from sonarsource

SonarqubeRunnerTeamCityTypeScriptDotnet

The important thing here is the additional Parameters that are below

-Dsonar.cs.dotcover.reportsPaths=dotCover.htm
-Dsonar.exclusions=**/node_modules/**,**/dev/**,**/*.js,**/*.vb,**/*.css,**/*.scss,**/*.spec.tsx,**/*.spec.ts
-Dsonar.ts.coverage.lcovReportPath=coverage/lcov.info
-Dsonar.ts.excludetypedefinitionfiles=true
-Dsonar.ts.tslint.outputPath=issues.json
-Dsonar.verbose=true

You can see our 3 artifacts that we pass is, we also disable the typescript analysis and rely on our analysis from tslint. The reason for this is it allows us to control the analysis from the IDE, and keep the analysis that is done on the IDE easily in sync with the Sonarqube server.

Also if you are using custom tslint rules that aren’t in the sonarqube default list you will need to import them, I will do another blog post about how we did this in bulk for the 3-4 rule sets we use.

Sonarqube without a language parameter will auto detect the languages, so we exclude files like scss to prevent it from processing those rules.

This isn’t needed for C# though because we use the nuget packages, i will do another blog post about sharing rules around.

And that’s it, you processing should work and turn out something like the below. You can see in the top right both C# and Typescript lines of code are reported, so this reports Bugs, code smells, coverage, etc is the combined values of both languages in the project.

SonarqubeCodeCoverageStaticAnalysisMultiLanguage

Happy coding!

Upgrading to Visual Studio 2017 Project file format

The new project file format drops the list of included files, as well as moving the nuget references into the csproj are the two biggest changes that you should be interested in.

These changes will greatly reduces your merge conflicts when you have a lot of developers working on a single project

There is a couple of pain points though, the first is that VS 2017 wont update your project files for you and there is no official tool for this. There is a community one available though you can download it here

https://github.com/hvanbakel/CsprojToVs2017

This tool only does libraries though, if you do a web project you’ll need to edit the file and put in you settings manually as well as adding “.web” to the end of the project type


<Project Sdk="Microsoft.NET.Sdk.Web">

Running this on you project files will convert them, however we were unlucky enough to have some people that have been excluding files from projects and not deleting them. So when we converted a large number of old cs files came back into the solution and broken it, as the new format includes by default and you need to explicitly exclude, there reverse approach form the old format.

So we have some powershell we wrote to fix this, firstly a powershell function to run per project


#removeUnused.ps1

[CmdletBinding()]
param(
[Parameter(Position=0, Mandatory=$true)]
[string]$Project,
[Parameter(Mandatory=$false)]
[ValidateRange(10,12)]
[switch]$DeleteFromDisk
)

$ErrorActionPreference = "Stop"
$projectPath = Split-Path $project
if($Project.EndsWith("csproj"))
{
$fileType = "*.cs"
}
else
{
$fileType = "*.vb"
}
$fileType

&nbsp;

$projectFiles = Select-String -Path $project -Pattern '<compile' | % { $_.Line -split '\t' } | `
% {$_ -replace "(<Compile Include=|\s|/>|["">])", ""} | % { "{0}\{1}" -f $projectPath, $_ }
Write-Host "Project files:" $projectFiles.Count

$diskFiles = gci -Path $projectPath -Recurse -Filter $fileType | % { $_.FullName}
Write-Host "Disk files:" $diskFiles.Count

&nbsp;

$diff = (compare-object $diskFiles $projectFiles -PassThru)
Write-Host "Excluded Files:" $diff.Count

#create a text file for log purposes
$diffFilePath = Join-Path $projectPath "DiffFileList.txt"
$diff | Out-File $diffFilePath -Encoding UTF8
notepad $diffFilePath

#just remove the files from disk
if($DeleteFromDisk)
{
$diff | % { Remove-Item -Path $_ -Force -Verbose}
}

Then another script that finds all my csproj files and calls it for each one


foreach($csproj in (Get-ChildItem . -Recurse -Depth 2 | Where-Object {$_.FullName.EndsWith("csproj")}))
{
.\removeUnused.ps1 -Project $csproj.FullName -DeleteFromDisk
}

You can run it without the delete from disk flag to just get a text file with what things it will potentially delete to test it without deleting any files